Beginner’S Guide To Clay Molding And Shaping
Clay has been used as an artistic medium for thousands of years, with some of the earliest known clay sculptures dating back to 24,000 BCE. It remains one of the most popular and versatile mediums for creating three-dimensional works of art.
Clay is appreciated for its tactile qualities and malleability that allow artists to shape it into endless forms. The process of clay molding and shaping involves kneading the clay to improve its elasticity, using your fingers and different tools to sculpt shapes and textures, allowing time for pieces to dry, and finally firing at high temperatures to harden the clay.
Working with clay offers many benefits beyond creating beautiful objects. Molding clay is meditative, relaxing and great for stress relief. The feel of clay under your hands helps connect you with your creativity. Clay also provides immediate feedback so you can adjust your work as you go. And there’s no need for perfection – the joy comes from the process. That’s part of what makes clay such a wonderful medium for beginners and experts alike.
Types of Clay
There are several types of clay used in pottery and ceramics, each with different properties that make them suitable for certain applications. The three main types are earthenware, stoneware, and porcelain clays. Source
Earthenware clay is usually red or brown in color. It is made from sedimentary clays and easily worked and shaped. However, earthenware is porous and brittle when fired at lower temperatures between 1000°F to 2100°F. It’s best for beginner potters and decorative or non-functional wares. Source
Stoneware clay is dense, strong, and non-porous. It fires to a grayish-white or pale brown at high temperatures between 2200°F to 2400°F. Stoneware resists chipping and cracking and is commonly used for functional pottery like mugs, bowls, and vases. The high firing temperature makes it impermeable to water.
Porcelain clay is white, translucent and highly refined. It fires at the highest temperatures from 2300°F to 2600°F. Porcelain clay is extremely strong and durable. It has very low porosity, making it an excellent choice for functional wares and art pieces. However, porcelain can be challenging for beginners to work with compared to earthenware and stoneware.
Clay Tools and Equipment
Having the right tools and equipment is essential for clay molding and shaping. Here are some of the key items every beginner should have:
Essential Tools
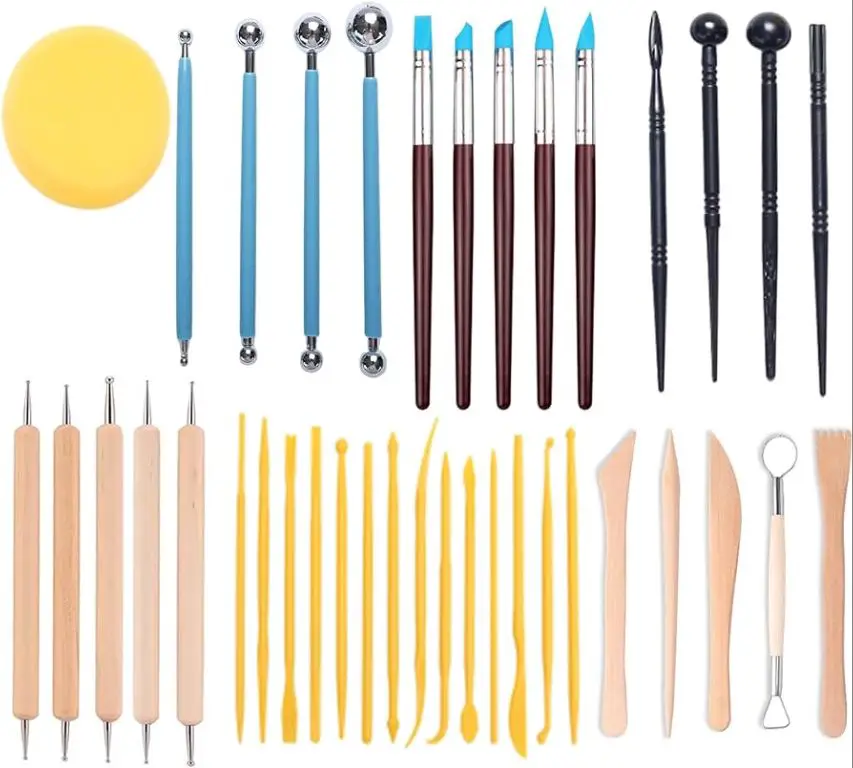
These basic tools are must-haves for working with clay:
- Sculpting sticks for scoring, slipping, smoothing, and shaping clay. Long, rounded sticks work well for accessing inner contours.
- Loop tools for carving out areas and detailing. Different sized loops create different effects.
- Sponge for moistening clay and smoothing surfaces. Natural sea sponges are best.
- Needle tool for poking holes and intricate detailing. The sharper the tip, the more precise lines you can make.
- Ribbon tool for smoothing rims and edges. The flexible ribbon glides smoothly along the clay surface.
- Wire tool for cutting clay and dividing sections. The thin sharp wire makes clean cuts.
- Fettling knife for trimming excess clay. The curved blade is ideal for detail work.
Refer to https://fowlersclayworks.com/basic-pottery-tools-for-beginners/ for more details on essential clay tools for beginners.
Optional Tools
Some other handy but non-essential tools include:
- Clay cutters for making flat even slabs.
- Rollers for achieving an even thickness when working with slabs.
- Texture mats and stamps for impressing patterns.
- Molds for shaping clay into specific forms.
- Extruders for producing uniform lengths of clay.
Equipment
Important equipment for clay work includes:
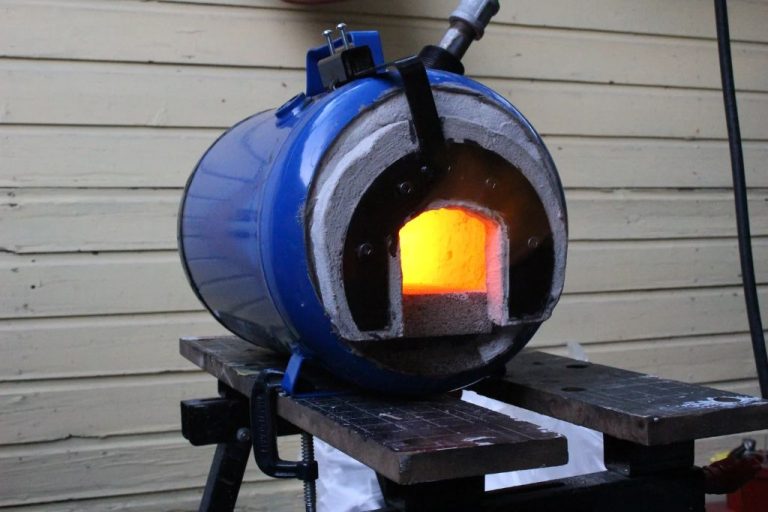
- Kiln for firing clay at high temperatures to harden and set it.
- Wedging table provides a large flat surface for wedging and kneading the clay.
- Bats are plaster or wood surfaces for supporting shaped clay pieces.
- Banding wheel allows you to turn and refine shapes while working.
Invest in reliable, high-quality equipment as you advance in clay shaping skills.
Preparing the Clay
Preparing the clay properly is a crucial first step before beginning any clay sculpting or pottery project. Air bubbles trapped in clay can lead to cracking or explosions when fired in a kiln. Kneading and wedging the clay removes these air pockets by working the clay until it has a uniform consistency.
Wedging involves rolling the clay into a ball, pressing it into a sausage shape, then bending it back over itself and reforming it into a ball again. This process stretches and reforms the clay, forcing out air bubbles. According to the article “How to Prepare Clay for Pottery” on ehow.com, start by rolling clay away from you by pushing down and away, then roll it back to you while putting your weight on it. Repeat this wedging process until the clay feels smooth and has no visible air bubbles.
The desired consistency of clay depends on the project. For handbuilding and sculpting, a medium stiffness helps the clay hold its shape while still being pliable. Add water gradually to dry clay, working it in thoroughly by kneading and wedging until it reaches the right consistency. Let the clay sit wrapped in plastic for several hours so the water can fully absorb. For throwing on the pottery wheel, a wetter consistency is preferred. However excessive moisture can make sculpted pieces too soft to hold form. Finding the ideal consistency takes practice.
Take the time to properly knead and wedge your clay before beginning any project. Well-prepared clay that has been thoroughly wedged and kneaded will lead to far fewer issues and failures down the line. Rushing the preparation step often leads to problems and frustration later in the sculpting process. Patience here pays off with clay that is smooth, elastic, lump-free and ready for shaping.
Clay Sculpting Techniques
There are four main techniques for sculpting and shaping clay:
Pinching
Pinching is one of the most basic clay handbuilding techniques. It involves pressing your thumb into a ball of clay to make simple forms like bowls, cups, and vases. Pinch pots are formed entirely by hand without the use of any tools. This method is great for beginners to learn how clay moves and responds. Source
Coiling
Coil building involves rolling out sausage-like coils of clay and stacking them on top of each other to build up height. The coils are then blended together using various techniques. This method is ideal for making taller pieces like vases, bowls, and jars. Coiling enables both freeform handbuilding as well as symmetrical pottery. Source
Slab Building
Slab building is the process of rolling out flat, even sheets of clay that are then cut into shapes and assembled into a sculpture. Slabs can be embellished with texture, attached to forms, or simply stacked to create geometric shapes. This technique is extremely versatile for both functional pottery and sculpture. Source
Wheel Throwing
Wheel throwing involves working clay on a pottery wheel to form symmetrical pieces. The clay is centered on the wheel and opened using thumbs. While the wheel spins, the clay is shaped using various techniques and tools. Wheel throwing allows for consistency and precision when making multiples of the same form, like cups or vases. Source
Creating Basic Forms
Some of the most common and classic projects that beginners start with when working with clay are basic functional forms like bowls, cups, vases, and plates. These are great starter projects to help you get familiar with shaping the clay and making symmetrical forms. When making round objects like bowls or vases, begin by rolling balls or thick coils of clay. Use your fingers to gently press the clay outward, turning the form to maintain even thickness on all sides.
Cups and bowls can be made by shaping the clay into a bowl form, then poking a hole in the bottom to create an open space. Flatten rolled pieces of clay into disks to make plates or plaques. Let gravity help shape the clay – place it over a rounded object and gently press down to form smooth curves for rounded vessels 1. Use craft sticks or other tools to further refine the rims and smooth surfaces. Allow your functional projects to firm up slightly before attempting any detailed shaping.
For beginners looking for a more artistic starter project, sculpting figures, animals, and abstract shapes is also an engaging way to get familiar with molding clay. Start simple – roll balls of clay for heads and bodies, pinch and pull to add limbs or features. Use references if needed. Let kids sculpt their favorite animals like dogs, cats, turtles, etc. Abstract sculpting allows total creativity – shape the clay intuitively into interesting coils, waves, towers or whatever you imagine!
Texturing and Decorating
Once you’ve sculpted your clay into the desired shape and form, it’s time to add interest and visual appeal through texturing and decorating techniques. This takes your clay art to the next level. There are many options for texturing clay to create beautiful effects.
Stamping
Stamping involves pressing pre-made stamps into the surface of the clay to imprint patterns and textures. You can find all kinds of clay stamps, from geometric shapes to floral designs, leaves, animals and more. Press the stamp firmly into the clay, then lift straight up for the cleanest imprint. Repeat stamps in a pattern or combine various designs for more complex effects.
Carving
Use clay carving tools with different shaped tips to incise lines, patterns and textures into the surface of the clay. Try carving crisscrossing diagonal lines, wavy water-like patterns, or imitating wood grain. Get creative with carving to add visual interest.
Burnishing
Burnishing is a technique where you rub the surface of the clay with a tool to create a smooth, shiny effect. Use a rounded modeling tool, plastic spoon or specialty clay burnishing tool. Apply pressure as you glide the tool over the surface in a circular motion. You can burnish the entire piece or just sections to create contrasting matte and polished finishes.
Adding Color
For dramatic color effects, apply colored glazes, metallic finishes and stains to your finished clay piece before firing. You can brush, spray or sponge the colors on freehand for abstract designs. Use tape or stencils to create crisp patterns and lines. Layer different colors for dimensional effects. Glazes and stains fuse permanently to the clay surface during firing to create durable, vivid colors.
Drying and Firing
After you have finished sculpting and decorating your clay pieces, they need to go through a careful drying and firing process to finish them properly. Slow drying is very important to prevent cracking and warping of the clay. Let pieces air dry for a few days, turning them periodically. You can also put pieces in a low temp oven (200F or less) for 8-12 hours if you need to speed up drying.
Once bone dry, the clay needs to go through a bisque firing to harden it. Bisque firing is done at a lower temperature, usually around 1600-1800F. Place pieces on stilts or kiln shelves to allow airflow underneath. Ramp up the kiln slowly, holding at 200F intervals. Soak at top temp for 30-60 minutes. Cool kiln slowly. After bisque firing, pieces will be ready for glazing.
For a finished piece, a glaze firing is needed. Apply glazes according to package directions. Use wads or stilts if needed to prevent glazes from fusing pieces together. Ramp kiln at recommended speed to reach glaze melting temperature, usually around 2000-2200F. Hold at top temp for 5-15 minutes. Cool kiln slowly. After glaze firing, pieces are ready to use!
To fire clay properly without a kiln, you can build a simple pit kiln outdoors insulated with ceramic fiber blankets. Use a grate to hold pieces above fuel such as wood or charcoal. Use thermocouples and cones to monitor temperature. Do test firings first. Firing clay takes patience and practice to master.
Troubleshooting Issues
When working with clay, there are some common issues that can arise. Three of the main problems are cracking, warping, and glaze imperfections.
Cracking often occurs when clay dries too quickly or unevenly. To prevent cracking, ensure the clay is properly wedged to remove air pockets. Slow down the drying process by wrapping works-in-progress in plastic. Fire clay slowly and evenly in the kiln. Consider applying a clay slip glaze when the piece is leather hard to help minimize cracking.
Warping happens when wet clay slumps or twists during drying. Using an appropriate thickness of clay for the piece’s size can help prevent warping. Allow proper dry time between stages. Avoid drying pieces too quickly. Fire evenly and use kiln props or stilts to minimize contact with the kiln shelf.
Glaze imperfects like crawling, crazing, or pinholing can be caused by issues with clay body absorbency, glaze thickness, or the kiln firing process. Test glaze and clay combinations to ensure compatibility. Apply multiple thin layers of glaze rather than one thick layer. Bisque fire pottery before applying the glaze. Ensure glazes and clay pieces are fully dry before firing.
When mistakes happen in the clay, there are some techniques to repair issues. For cracks, moisten the clay and massage the cracked area to blend it, then smooth with a rib. Use slip to fill holes or gaps. For warped pieces, wet the leather hard clay and reshape. Be prepared to re-refine details or add reinforcements like extra clay thickness after reshaping when needed. Let the clay dry slowly between steps to prevent more warping.
Next Steps After Mastering Basics
Once you have grasped the fundamentals of clay molding and gained confidence with the basic techniques, you may be ready to advance your skills further. Here are some next steps to consider after getting the basics down:
Trying the pottery wheel – The pottery wheel allows you to center and shape clay in a new way by using centrifugal force. With practice, the wheel opens up options for perfectly symmetrical pieces. Take a class or watch tutorial videos to learn how to center clay and pull up cylinder forms on the wheel. Start with simple cylindrical pots and mugs before attempting more complex shapes.1
Creating larger, more complex projects – Clay sculpting on a small scale is very different than creating large, detailed sculptures. Consider advancing to life-size busts, abstract human forms, or intricate scene compositions. Building an armature frame can help support the weight of larger clay projects. Pay extra attention to structural integrity and minimizing cracking or breakage.2
Selling finished pieces – Once you are consistently creating high quality clay work, consider selling your art online or at local craft fairs and markets. Calculate prices based on clay cost, firing fees, time investment, and comparable prices for similar work. Market yourself on social media and have business cards available. Enjoy bringing joy to buyers and making a profit from your artistic skills.