Creative Clay Art Techniques: Ideas For Your Next Project
Clay is a versatile art medium that has been used for thousands of years to create both functional and decorative objects. From ancient Greek pottery to contemporary sculpture, clay allows artists to shape and mold works of art with their hands. The natural sculptability and plasticity of clay makes it an ideal material for creative expression.
Clay can be molded, carved, thrown on a pottery wheel, pressed into molds, or built up additively. It can hold fine detail yet also be formed into large monolithic sculptures. When fired at high temperatures, clay undergoes a chemical change and becomes harder and more durable. The final surface can be left natural, painted, or glazed.
Clay is appreciated for its accessibility and affordability as an art material. It also has sensory appeal – the feeling of clay responding to touch lends intimacy and connection to the creative process. From modeled figures to thrown vases to ceramic jewelry, clay allows for an endless variety of artistic techniques and aesthetic effects for all skill levels.
Sculpting
Sculpting is one of the most popular clay techniques for creating free-form and organic shapes. There are several handbuilding sculpting methods that allow artists to build clay pieces from scratch without the use of molds.
Coil building involves rolling out and stacking coils of clay on top of each other to build up forms. This technique is great for making taller vessels, sculptural pieces, and adding decorative elements like textures.[1]
Slab building uses flat, rolled out pieces of clay that can be cut, layered, and joined together. Clay slabs allow for both geometric and organic shapes. Slabs are often used for making functional pottery, tiles, and relief sculptures.[1]
Pinch pots start with a ball of clay that is pushed and pinched into shape using fingers and simple tools. This intuitive technique is one of the easiest ways to make small bowls, cups, and organic forms.
Texturing
Texturing clay adds visual interest and dimension to ceramic pieces. There are many techniques to create textures on clay surfaces using tools or found objects. Impressing objects into the clay surface is a simple texturing technique. Items with interesting textures like lace, burlap, bubble wrap, and mesh can be pressed into the soft clay surface to leave behind their unique imprint. Carving into leather-hard clay with tools like loops, ribs, and cutters is another texturing method. Scratching the surface with serrated sculpting tools or scoring with the edge of a knife creates lines and patterns. Applying ceramic texture paste or slip over the clay and scratching through it also yields textural effects. Rubbing textured items over the surface can distress areas to look aged or weathered.
Some texturing techniques to try include:
– Pressing nuts, bolts, sea shells, leaves, etc. into the clay
– Dragging combs, serrated tools, forks through the surface
– Incising geometric patterns with loop tools
– Brushing on texture pastes like TerraSigillata & imprinting
– Scratching through colored slips to reveal layers
– Sgraffito designs by carving through a slip layer
The options for texturing clay are limitless. Explore using household objects like rubber stamps, stencils, plastic nets, burlap, or bubble wrap. Textures add visual richness and should enhance the overall design.
Slip Trailing
Slip trailing is a fun decorative technique that involves using liquid clay slip to draw directly onto leather-hard clay. Here’s an overview of slip trailing basics:
Slip is liquid clay made by mixing clay powder with water to create a milk-like consistency. Choose a clay body that matches or contrasts with your piece for best results. Prepare the slip ahead of time so it has time to de-air.
Use a slip trailing bottle or piping bag to apply the slip. Bottles with metal tips allow you to draw very fine lines. Adjust the slip consistency so it flows smoothly but still holds a line.
Plan your design first since slip dries quickly once applied. Consider geometric patterns, animals, landscapes, letters, etc. You can add color by using colored slips.
Wait for the slip to dry slightly before wiping away any excess slip. Bisque fire carefully according to clay instructions. Finally, glaze if desired and fire to maturity.
With practice, you can create precise, painterly designs. Slip trailing brings elegant decoration to pottery. For inspiration, see examples at this ceramic arts tutorial.
Mosaic
Mosaic art using clay is a fun and creative way to make beautiful designs. You can make mosaic tiles from polymer or air-dry clay in different shapes, sizes, and colors. Assemble the clay tiles into patterns and pictures by gluing them onto a base surface like wood, cardboard, or stretched canvas.
To make clay mosaic tiles, condition your clay by kneading until soft and pliable. Roll out slabs about 1/8 to 1/4 inches thick and use cookie cutters or an X-Acto knife to cut out tile shapes like circles, squares, triangles, hearts, etc. Bake the tiles according to the clay manufacturer’s instructions. Let cool completely.
Plan your mosaic design and sketch it out on your base surface if desired. Apply tacky glue or adhesive to the back of each tile and press in place one by one, assembling your pattern. Use grout between the tiles with a popsicle stick or rubber tool to help adhere the pieces. Let the finished mosaic cure 24 hours before sealing.
You can make clay tiles in all one color or use multiple colors of clay for more complex mosaics. Addinterest by alternating between matte and glossy tiles. Embellish further by imprinting patterns into the clay or adding beads, charms, or found objects. The creative possibilities are endless!
For inspiration, see this mosaic polymer clay wall art: [insert url citation here]
Stamping
Stamping is a fun and creative way to add patterns and textures to polymer clay. You can use custom stamps, found objects, or everyday household items to imprint designs into the clay surface. The clay should be conditioned, smooth, and at the right consistency – not too soft or hard. Leather-hard clay works best for detailed stamp impressions.
According to Old Forge Creations, custom stamps can be made from erasers, tiles, bubble wrap, cardboard, foam, or any object with an interesting texture. Roll an even layer of conditioned clay and press the stamp in using firm, even pressure. Lift straight up to leave a clean imprint. Reapply stamp ink or petroleum jelly over the stamp surface as needed.
4Clay recommends spraying the stamp surface before marking clay if using a press instead of hand pressure. This helps prevent sticking. Experiment with colors by partially overlapping stamped areas with contrasting colors of clay.
Surface Decoration
Surface decoration refers to techniques for embellishing the exterior of a ceramic piece. There are many options for adding color, texture, and artistic flair. Popular surface decoration techniques include using paints, stains, glazes, and more.
Paints come in a variety of opaque and translucent formulations that can be brushed or sponged onto bisqueware. Acrylics and poster paints work well. More specialized ceramic paints like underglazes and engobes integrate beautifully with glazes. Stains are used to create flowing, watercolor-like effects. They penetrate unglazed clay and develop rich, mottled colors after firing. Waxes and oil pastels can also be used to draw or paint designs.
Glazes are vitreous coatings that form a glassy surface when fired. A huge array of colors and textures can be achieved with glazes. They may be applied by brushing, dipping, or spraying. Combining layers and types of glazes allows for even more creative possibilities. Clear glazes can be used over stains, underglazes, or paints to unify and enhance the designs. Proper preparation, firing, and application are key for vibrant, durable glazed surfaces.
With so many options to choose from, surface decoration is an exciting way to make your ceramic creations truly unique. A blend of techniques can yield stunning results. Don’t be afraid to experiment and find what works for your artistic vision.
Mixed Media
Mixed media clay art combines clay with other materials to create innovative and unique pieces. Popular mixed media choices include metal, wood, glass, paper, fabric, and found objects. Incorporating metal elements like wire, nails, washers, or beads adds texture and an industrial vibe. Mixing in wood pieces creates natural contrast and visual interest. Adding bits of repurposed paper makes a statement about recycling and sustainability. Fabric scraps introduce softness, pattern, and color.
To attach metal and wood inclusions, score the surface of the clay and apply liquid clay as “glue.” For lightweight paper or fabric, simply press the materials into the surface of the moist clay. Glass inclusions can be applied similarly to metal and wood. Found objects like sea shells or stones can make lovely natural accents. Plan inclusions and textures at the design stage for cohesive overall composition.
Firing requirements may vary for mixed media clay depending on the included materials. Research firing procedures or contact the clay manufacturer. Some metals or found objects may need to be added after firing using strong adhesives. Allow sufficient drying time and use sealants for longevity.
Firing and Finishing
Firing clay is an essential step in transforming soft clay into a hard, finished ceramic piece. There are various methods of firing clay, each producing unique results in the final ceramic artwork. Here are some of the most common firing techniques:
Bisque firing refers to the first firing of greenware or unfired clay objects. Firing to a temperature between 900°F and 1100°F, bisque firing chemically bonds clay particles to convert soft clay into a hard, porous ceramic called bisque. Bisque firing prepares the clay for the application of glazes and further firings.[1]
Glaze firing is the process of firing glazed clay objects to fuse the glazes to the clay body. Glaze firing is done between 2,200°F and 2,300°F, melting the glaze materials to form a smooth, glassy surface. Different glaze materials require specific glaze firing temperatures and lengths for best results.[1]
Raku firing is a low-fire technique where pottery is removed from the hot kiln and placed into containers with combustible materials like sawdust or paper. This exposes the pottery to reduction atmospheres that create unique metallic, crackled, or carbonized surface effects. Raku firing and glazing techniques facilitate bold visual results.[2]
Pit firing involves placing pottery in a shallow pit or trench filled with combustible materials like sawdust, leaves, cardboard, or wood. The fueled pit is lit, firing the pottery directly instead of using a kiln. Natural effects from ash, smoke, and flame create distinctive surfaces on pit fired pieces.[2]
Inspiration and Ideas
Looking for creative inspiration for your next clay art project? Here are some tips and ideas to get your creative juices flowing:
Check out galleries of clay art online or in books for inspiration. Seeing what other artists have created can spark new ideas. For example, this Pinterest board has hundreds of clay projects for kids with lots of creative examples.
Look to nature for inspiration. Try making clay sculptures of your favorite animals, plants, seashells, or landscapes. Or use items from nature like leaves, flowers or seashells to imprint textures and patterns into your clay.
Get creative with mixed media projects by combining clay with other materials like wood, glass beads, feathers, or found objects. Layer and attach different elements to make one-of-a-kind clay sculptures.
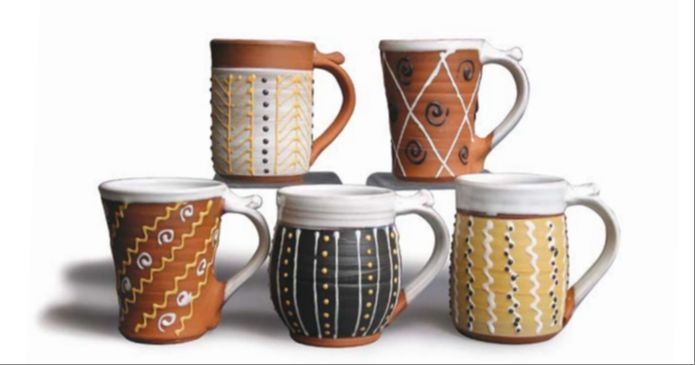
Make functional pieces like bowls, mugs, plates, or jewelry that have unique handmade style. Experiment with shaping, texturing, carving, coloring, and glazing techniques.
Upcycle thrift store finds by sculpting clay elements onto them. Try adding clay textures, shapes, and accents to vases, boxes, candles, or frames for an artsy upcycled look.
Let your imagination run wild! Whimsical clay creatures, fanciful houses, and abstract sculptural forms are all possibilities. Play and experiment with the clay medium to bring your creative vision to life.