Can You Make Air Dry Clay Without Glue?
Air dry clay is a modeling material that dries naturally at room temperature. It contains no clay minerals, and does not require firing in a kiln. Instead, air dry clay hardens as the water evaporates over time. Many popular clay brands contain vinyl glue or other additives to help the clay hold its shape as it dries. However, it is possible to make your own air dry clay at home without any glue or other synthetic ingredients.
Making clay without glue is an easy, affordable project using just a few simple kitchen ingredients. The main components are baking soda and cornstarch, which create a doughy texture that hardens into clay. This homemade clay is safe, non-toxic, and fun to mold into creative shapes and sculptures. Best of all, it air dries naturally so no baking or firing is required.
Benefits of Making Clay Without Glue
Making air dry clay without glue has some great benefits. Using all natural ingredients avoids potentially harmful chemicals found in many commercial clays. Common clay ingredients like flour, salt, and water are likely already in your kitchen, so you don’t have to buy anything special. Crafting your own clay at home saves money compared to buying pre-made clay. Overall, making your own clay allows more creativity with ingredients and colors, while being better for your health and wallet.
Basic Ingredients
The basic ingredients needed to make homemade air dry clay are simple items you likely already have in your kitchen. The key ingredients are:
- Flour – The flour acts as the base and gives the clay its stiffness when dry. All purpose flour or cake flour work best.
- Salt – The salt is added to harden the clay. Table salt or sea salt will both work.
- Water – The water hydrates the dough and allows it to be molded. You’ll add just enough water to form a smooth dough.
- Optional: cream of tartar, oil, glycerin – Small amounts of these optional ingredients can be added for extra flexibility, smoothness, or anti-mold properties.
With just these basic pantry staples, you can easily whip up your own clay. The exact ratio of ingredients depends on the consistency you want to achieve.
Ratio of Ingredients
The basic ratio for homemade air dry clay is:
- 2 parts flour
- 1 part salt
- 1 part water
This 2:1:1 ratio of flour, salt, and water forms the base of simple homemade air dry clay. You can modify the ratios slightly to adjust the texture and properties of the clay.
Some optional ingredients to try adding in various ratios include:
- Cornstarch – adds flexibility
- Glycerin or lemon juice – helps keep clay workable
- Cream of tartar – strengthens clay
- Food coloring – colors clay
Start with small amounts of any optional ingredients, like 1 tablespoon per cup of base clay. Adjust to achieve the texture and workability you want.
Mixing the Ingredients
Once you have measured out the correct ratios of your ingredients into a large bowl, it’s time to start mixing everything together. Here are some tips for combining the ingredients properly:
Start by stirring the dry ingredients like flour, cornstarch, and salt together thoroughly with a large spoon or whisk. Break up any clumps. Next, add the wet ingredients like lotion, conditioner, or oil and stir again. The mixture will start to look shaggy.
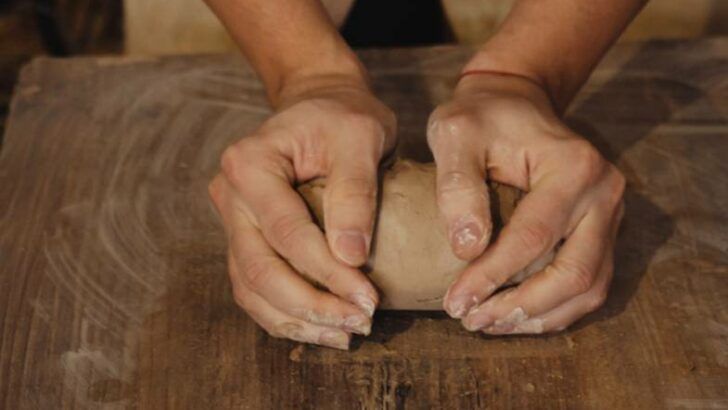
Now it’s time to get your hands dirty! Start kneading the mixture with your fingers, squishing ingredients together and squeezing them through your fingers. Keep kneading for 3-5 minutes until the mixture starts to come together into a smooth, clay-like dough. Add a splash of water if needed to reach the right consistency.
Knead the clay vigorously to combine everything evenly. Press into the clay firmly with the palms of your hands, fold the clay over on itself, and rotate it 90 degrees. Repeat kneading motions for a few minutes. The clay should become smooth, elastic, and free of lumps.
If the clay is still crumbly, continue kneading while misting hands and clay with water. The clay will absorb a bit more water as you knead it. Don’t over-knead or the clay can become too sticky. Simply knead until mixture holds together smoothly.
Coloring the Clay
There are a couple different options for coloring homemade air dry clay without using any additional glues or dyes. Here are some of the easiest ways to add color:
Food Coloring
Food coloring is readily available and easy to mix into the clay. Just add a couple drops into the dry ingredients when mixing up a batch. Keep adding drops until you achieve the desired shade.
Since food coloring is translucent, it may take quite a bit to get truly vibrant colors. And because food coloring is water-based, too much will make the clay sticky.
Natural Colorants
For a non-toxic option, use things found in your kitchen to naturally color the clay. Turmeric, cinnamon, and curry powder can add nice earthy yellow/orange hues. Beet juice or powder makes a reddish purple clay. Activated charcoal blackens the clay.
Spinach, parsley, or other green veggies will tint the clay green. Blue or purple cabbage simmered in water makes a blue/purple dye. Just strain out the solids before mixing the colored cabbage water into the clay.
Natural dyes often provide more subtle or muted tones than synthetic food coloring. But the benefit is they are safe and derived from ingredients you already have at home.
Storing the Clay
Properly storing your homemade air dry clay is important for maintaining its freshness and prolonging its shelf life. Here are some tips for storage:
Store the unused clay in an airtight container or plastic bag by forcing out any excess air. This prevents the clay from drying out. Glass jars, plastic containers, or resealable bags all work well.
Refrigerate the clay if you won’t be using it soon. The cool temperature of the refrigerator slows down the drying process. Simply store the sealed clay in the fridge and it will stay usable for many months.
If refrigeration isn’t an option, you can store the clay at room temperature. It will gradually dry out over time, but will remain usable for a few weeks when sealed in an airtight container.
Avoid freezing the clay, as this can cause changes in the structure and consistency when thawed.
With proper storage methods, homemade air dry clay can last for quite a while. Just be sure to keep it sealed from air exposure and cool if possible. Then it will be ready for all your crafting projects and activities down the road.
Projects
Air dry clay without glue opens up a world of DIY crafting possibilities. Here are some of the many projects you can create:
Figurines
Sculpt your own original figurines, characters, animals, and more. The clay holds fine detail nicely, so you can make intricate designs. Let your imagination run wild!
Jewelry
Make your own customized jewelry pieces out of clay. Craft rings, pendants, beads, earrings, and bracelets. Add sequins, glitter, or paint for extra flair.
Bowls
Shape the clay into bowls, plates, cups, and other dishware. Impress guests at your next dinner party with handmade ceramic dining pieces.
Decor
Create one-of-a-kind vases, coasters, knick-knacks, wall hangings, plant pots, and more. Personalize your living space with DIY clay decor items.
Creative Uses
Get creative with the clay! Sculpt game pieces, make your own stamps, design wall tile, or embed items like coins and seashells. The possibilities are endless.
Tips and Tricks
Here are some tips and tricks for working with homemade air dry clay to help your projects turn out their best:
Smoothing Techniques
Air dry clay can often dry with a rough, bumpy texture. Here are some ways to help smooth it out:
- Use a rolling pin over the surface while the clay is still wet to flatten bumps and smooth seams.
- Rub a wet finger over areas to moisten and smooth surface texture.
- Use sandpaper, fine grit sanding sponges or emery boards once fully dry to smooth rough areas.
- Apply a thin layer of slip (liquid clay) to help blend pieces together seamlessly.
Avoiding Cracking
To prevent cracking as the clay dries:
- Avoid making pieces too thick, which take longer to dry and can crack.
- Let pieces dry slowly, away from direct sun/heat sources.
- Wrap unfired pieces in plastic wrap to retain moisture if drying too fast.
- Consider adding a few drops of glycerin to homemade clay recipes for flexibility.
Conclusion
Making homemade clay without glue is a fun and creative project for both kids and adults. With just a few simple ingredients like flour, salt, water, and oil, you can make your own air dry modeling clay that’s safe, malleable, and ready for crafting. The exact measurements and ingredients can be adjusted to achieve your desired texture and consistency.
While it may take some trial and error to perfect your homemade clay recipe, the end result is an affordable clay free of chemicals, preservatives, and allergens. This clay is ideal for sculpture, pottery, jewelry, ornaments, and more. With a variety of colors and glazes, the possibilities are endless. Best of all, air dry clay is easy to store and reuse for future projects.
Homemade clay allows you to unlock your creativity and craft beautiful objects with your own two hands. The process of making and molding clay is soothing and satisfying. Share the joy of sculpting with children to encourage artistic expression and inspire imagination. With some simple ingredients and a few basic techniques, you can create wonderful homemade clay crafts to gift or proudly display.