Finding Your Muse In Clay: Inspirational Art Ideas
Sculpting and working with clay has long been appreciated as both an art form and a therapeutic practice. The tactile nature of clay and its incredible versatility make it one of the most popular mediums for creative expression. Clay allows artists to bring their imaginations to life in 3D form. It can be molded, shaped, carved, scraped, and transformed in endless ways. From ancient pottery and sculptures to contemporary clay art, clay continues to captivate and inspire artists today.
The therapeutic benefits of working with clay have also been well documented. Molding clay engages the senses and promotes focus and mindfulness. It has been shown to reduce stress, anxiety, and depression while boosting mood and self-esteem. Clay therapy techniques are used in art therapy, occupational therapy, and psychotherapy settings. Both the creative process and the final sculptures can be powerful tools for healing, self-discovery, and personal growth. This article will explore the many inspirational and therapeutic possibilities of sculpting with clay.
History of Clay Sculpting
The history of clay sculptures can be traced back to some of the earliest civilizations over 30,000 years ago, with evidence of clay art discovered from Ancient Egypt, the Indus Valley, Mesopotamia and more. Some of the earliest known clay sculptures date back to 25,000 BCE and include the Venus of Dolní Věstonice. Throughout history, civilizations around the world shaped clay into figurines, vessels, and sculptures for both functional and artistic purposes.
During the Neolithic period starting around 10,000 BCE, early pottery and ceramic art emerged across cultures. Techniques like pinching, coiling, and slab construction developed to shape clay into new forms. Kilns were also invented to fire and harden clay. Cultures like the Jomon in ancient Japan created elaborate coil built pottery and anthropomorphic figures.
In the Bronze Age starting around 3500 BCE, techniques advanced to create detailed ceramic sculptures and pottery. The ancient Egyptians used clay for canopic jars, small figures, bricks and tiles. Around 2000 BCE, the Indus Valley civilization also produced finely crafted sculptures of animals and people. https://themarshallgallery.com/post/4956-what-is-the-history-of-ceramic-art-sculpture
As civilizations developed specialized pottery techniques, sculpture in clay diverged as its own art form. In ancient Greece and Rome, sculptures of deities, warriors, animals and other figures were mass produced. Important technical innovations also emerged including using molds, allowing identical multiples of a sculpture to be produced.
Clay Sculpting Techniques
There are several key techniques used in clay sculpting that allow artists to shape and form their creations. Three of the most common are handbuilding, wheel throwing, and molding.
Handbuilding involves manipulating the clay by hand to create forms. Some handbuilding techniques include pinch pots, coils, and slabs. Pinch pots are made by pinching and pulling the clay into shape. Coils are rolled pieces of clay that can be stacked or layered to build up a form. Slabs are flat pieces that can be cut, shaped, and joined together (Clay Sculpture Techniques and Tips).
Wheel throwing uses a potter’s wheel to shape clay into symmetrical forms like bowls, vases, cups, and more. The clay is centered on the wheel and then manipulated as the wheel spins (8 Must-Know clay modeling techniques). This takes practice but allows for consistency and precision in shaping clay.
Molding involves pressing clay into or around a pre-formed mold to create a shape. Once the clay hardens, the mold can be removed and the shaped clay remains. Molds allow for reproducing the same form multiple times.
Understanding these fundamental techniques opens up creative possibilities for sculpting in clay. Artists can combine approaches like using slabs and coils together or molding custom elements to add to wheel thrown pieces.
Inspirational Clay Sculptors
Clay sculpting has been practiced as an art form for thousands of years, with artisans creating incredible works from this elemental medium. Over the centuries, many clay artists have made their mark with groundbreaking and beautiful sculptures that inspire clay artists today.
Some of the most famous and influential ceramic sculptors include Edmund de Waal, known for his minimalist porcelain vessels; Shio Kusaka, recognized for her nature-inspired abstract pieces; and Grayson Perry, celebrated for his colorful pots and vases in an alter ego feminine persona. Other acclaimed ceramic artists are Magdalene Odundo, known for her sleek sculptural forms; Clare Twomey and her monumental installations; Betty Woodman and her exuberant hybrid ceramic-paintings; and Jennifer Lee, who creates vivid ceramic wall works.
These clay sculptors have not only produced their own stunning bodies of work, but also influenced generations of ceramic artists with their innovative techniques, creative visions, and mastery of the medium. Their unique styles, artistic journeys, and contribution to ceramic arts continue to motivate and inspire clay sculptors today.
Ideas for Clay Sculptures
There are many different types of sculptures you can create with clay, ranging from figurative works depicting animals or people to abstract designs focused on shapes and textures. Functional pieces like bowls, vases, and tiles also make for rewarding clay sculpting projects.
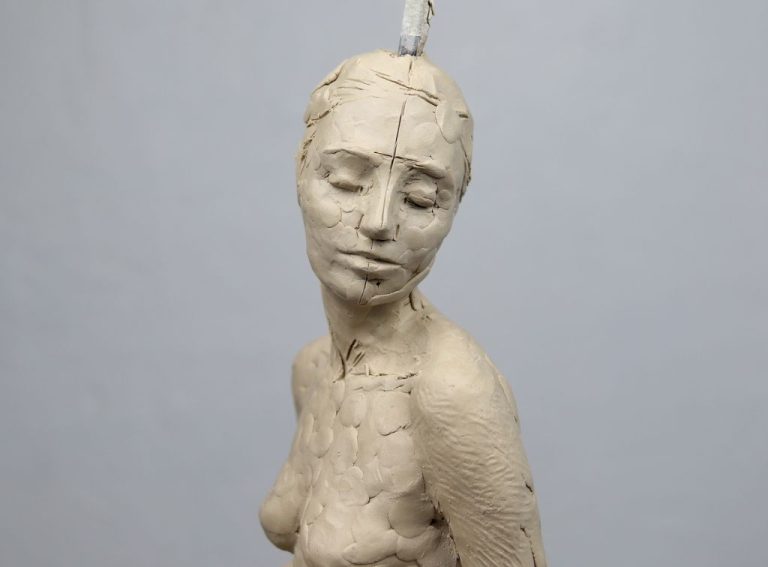
Figurative sculptures allow you to practice shaping lifelike forms. Try sculpting a person, pet, or wildlife scene. Focus on capturing unique poses and realistic anatomy. Smooth, refined surfaces can make figures seem to come to life. For inspiration, look to sculptors like Degas or Rodin.
Abstract sculpture centers more on imagination, letting go of realism in favor of channeling feelings or ideas into art. Experiment with interesting shapes, textures, patterns, and colors. Let your inner vision guide the flow of the clay. Abstract artists like Henry Moore used clay to create fluid, biomorphic forms.
Functional clay works involve sculpting pieces meant for everyday use, like mugs, bowls, vases, or tiles. Make sure to use clay suited for high-fire kilns. Consider smooth, simple shapes that feel good in the hand. Impress patterns into soft clay for added visual interest. Check dimensional tolerances so lids fit properly.
For inspiring clay sculpture ideas, browse sites like Pinterest. Let your imagination lead you to create clay art that expresses your unique vision and creativity.
Supplies for Clay Sculpting
Having the right supplies is essential for successful clay sculpting. The most important supply is the type of clay. The three main types of clay used in sculpting are:
- Oil-based clays – These include clays like plasticine or plastilina. They never dry out, allowing you to continually work a piece. However, oil-based clays cannot be hardened.
- Water-based clays – Clays like pottery clay or polymer clay fall into this category. They can be dried and fired in a kiln to harden them. Water-based clays allow more permanence in the finished sculpture.
- Wax-based clays – Waxes like Chavant NSP are wax-based and can be shaped when warm. They cool and harden at room temperature. Wax clays capture fine detail well.
Some key sculpting tools include: metal sculpting tools like loops, ribs, and shapers to manipulate the clay; sculpting stands or armatures to support work in progress; clay cutting wires and knives; and calipers or rulers to measure precise proportions.
Other helpful equipment includes clay roller or slab roller, clay extruder, kiln or oven for firing pieces, and smooth work surfaces like glass or marble. Having a range of textures or objects to imprint texture is also useful. With the right selection of clay and tools, you’ll be ready to sculpt anything you imagine.
Preparing Your Clay
Properly preparing your clay is an essential first step before beginning any clay sculpture. Kneading and wedging are two key techniques for getting your clay ready to work with.
Kneading involves repeatedly pressing into the clay with the palms of your hands to soften it and make it more pliable. Knead clay just like you would knead dough – push into it, fold it over, and repeat. The warmth and pressure from your hands releases air bubbles and makes the clay smooth and uniform [1]. Knead for 5-10 minutes until the clay is soft, smooth, and free of lumps.
Wedging is another important preparation technique. To wedge, cut off a chunk of clay and smash it down into a thick slab on your work surface. Then, pick up the slab and throw it down again while folding the clay over on itself. Repeat this process, rotating the clay each time. This removes air pockets and leads to greater consistency throughout the material [1]. Aim for an even, smooth texture with no cracks after wedging.
Pay attention to the clay’s consistency as you prepare it. Add water a few drops at a time if it is too firm. Let excess moisture evaporate if the clay is sticky. The finished clay should be smooth, pliable, and maintain its shape when molded [2]. With proper kneading and wedging, your clay will be ready for sculpting.
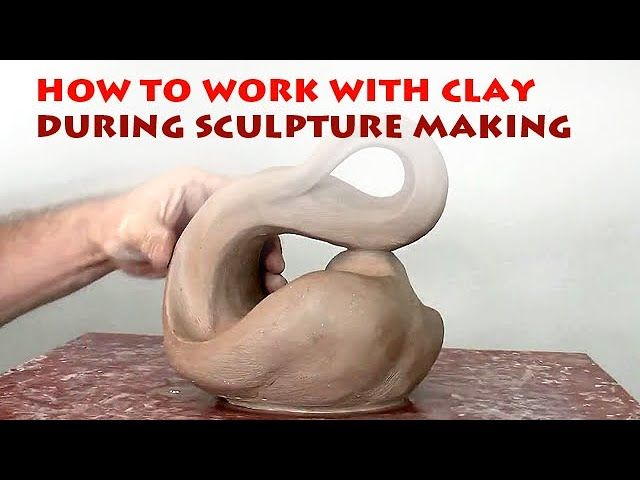
Clay Sculpting Process
The clay sculpting process involves several key steps from start to finish. Here is an overview of the process:
-
Prepare your workspace and gather your materials – Make sure you have a flat, sturdy surface to work on and tools like sculpting sticks, loop tools, ribbon tools, etc. Organize your clay, water spray bottle, paper towels, and reference images.
-
Condition your clay – For oil-based clays, knead it until soft and pliable. For polymer clay, condition it by pressing a clay roller over it. For water-based clays, spray water as you knead to reach ideal consistency.
-
Create an armature or skeleton (optional) – For large or complex sculptures, build an armature with wire, foil or other materials to support the clay.
-
Block in the basic forms – Start to shape the general forms using your hands or basic sculpting tools. Work from large forms to smaller details. Continually step back to evaluate the overall composition.
-
Refine the shapes and add details – Use specialized sculpting tools to refine forms, add textures, etc. Consider rhythm, flow, proportions and balance.
-
Let the sculpture dry – For water-based clays, let it air dry fully. For other clays, let it stiffen before baking/firing according to manufacturer’s instructions.
-
Finish the sculpture – Sand, paint, varnish or add other finishes as desired once dried/fired. Add a base if needed.
Work slowly and methodically. Don’t rush through sculpting or try to add too much detail too soon. Be patient and enjoy the process. Mistakes can be fixed. Taking your time will pay off in a better end result.
Troubleshooting Clay Sculptures
Clay sculptures are delicate works of art that require care in handling and preserving. Even the most experienced sculptors can encounter issues like cracking, breaking, or collapsing of the clay. Thankfully, there are tried and true methods for troubleshooting common clay sculpture problems.
One of the most common issues is cracks forming in the clay, especially as it dries. To prevent cracking, maintain an even moisture level while sculpting. Avoid extremes of wet and dry. Also, work at an appropriate pace and avoid rushing fragile areas that require time to firm up. Pay attention as you sculpt sections that extend or protrude, as these are prone to cracking.
If cracks do appear, there are several fixing techniques. For fine cracks, gently rub liquid clay slip into the crack and smooth over. For larger cracks, drill small holes at each end and bridge over the gap with thin clay coils, securing them with slip. Pieces that fully break apart can be reattached with slip and scoring the surfaces. Be sure to blend repairs smoothly for the best finish.
Clay pieces can also collapse or sink from soft spots or uneven drying. Reduce chances of this by using an armature for support and allowing proper dry time between sections. If areas sink, you may be able to carefully push them back into shape with your fingers or tools and let dry further. Be gentle to avoid more damage.
For completely collapsed sections, remove the broken area and rebuild with additional clay, securing it with scoring and slip. Blend new and old clay together, and use an armature for stability. Allow plenty of dry time before adding more clay. Patience and persistence can rescue even severely damaged sculptures.
With care and some basic repair knowledge, you can troubleshoot many clay sculpture problems. Pay close attention while sculpting, and don’t hesitate to fix any issues that arise using the methods described here. With practice, you’ll gain confidence for rescuing damaged clay artwork. For more tips, refer to this helpful guide: https://community.ceramicartsdaily.org/topic/29230-repair-unfired-clay-sculpture/
Displaying Clay Sculptures
Once your clay sculpture is complete, you’ll want to display it in a way that showcases your hard work and creativity. Proper presentation and lighting can really make your artwork pop.
Choose an appropriate base or stand for your sculpture. This provides support and stability, as well as enhancing the overall look. Wood, glass, acrylic and metal bases work well for displaying clay pieces. See some clever options at https://www.pinterest.com/mdmdx2/clay-display/.
Pay attention to lighting. Avoid direct sunlight which can fade colors over time. Instead use soft, diffuse lighting that illuminates the sculpture from multiple angles. Track lighting or multiple table lamps work well. Experiment with light placement to find what brings out the best details.
Elevate sculptures to enhance visibility. Place them on shelves, tables or pedestals at eye level. Make sure they are secure and cannot be easily knocked over.
Consider the background. A neutral wall, fabric or acrylic sheeting helps the sculpture stand out. Or incorporate it into a themed display with other decorative objects.
Add descriptive labels. Note the title, medium, size and artist name. This gives helpful context for viewers.
Finding the right presentation and lighting for your clay artwork takes experimentation. But proper display can make your creative efforts shine.