How Do You Draw A Rib Anatomy?
Understanding rib anatomy is crucial for artists striving to accurately depict the human form. The chest contains vital organs like the heart and lungs, protected by an intricate rib cage formed from 12 pairs of ribs. Mastering the contours and structure of ribs enables more realistic renderings of the upper body in artistic mediums.
According to Why is the Rib Cage So Important? – Human Body Learning, “The rib cage is like a safety shield for your chest. It’s your body’s natural protection around your lungs and heart.” Carefully studying rib anatomy helps artists capture this essential body part and its vital internal structures.
Skeletal Structure
The rib cage is formed by 12 pairs of ribs that are attached to the thoracic vertebrae of the spine. Humans typically have 24 ribs in total, with 12 on each side of the body. The ribs are numbered 1-12 starting at the top of the rib cage. The first 7 pairs of ribs are known as “true ribs” because they attach directly to the sternum through the costal cartilage. The next 3 pairs (8-10) are called “false ribs” since they connect indirectly to the sternum through the cartilage of the rib above. The last 2 pairs (11-12) are known as “floating ribs” as they do not attach to the sternum at all.
Each rib is an elongated, curved, flat bone that encircles and protects the thoracic cavity. The ribs get progressively shorter as they descend, with the upper ribs being more oblique and the lower ribs being more transverse. This forms the rounded, cage-like structure of the rib cage. The slope of the ribs allows them to move upwards and outwards during inhalation to facilitate breathing.
Source: https://www.medicalnewstoday.com/articles/how-many-ribs-do-humans-have
True Ribs
The first seven pairs of ribs are called true ribs (ribs 1-7). As described by Britannica, “In humans there are normally 12 pairs of ribs. The first seven pairs are attached directly to the sternum by costal cartilages and are called true ribs.”
These true ribs articulate directly with the sternum anteriorly via their costal cartilage (Safarini, 2022). The posterior ends of the true ribs articulate with the thoracic vertebrae of the same number, meaning the first rib articulates with the first thoracic vertebra, the second rib with the second vertebra, and so on.
As explained by RegisteredNurseRN.com, “The true ribs include rib pairs 1-7, with each rib articulating posteriorly to the thoracic vertebrae and anteriorly to the sternum via costal cartilages.”
False Ribs
Ribs 8 through 12 are referred to as false ribs. Unlike the true ribs, these false ribs do not attach directly to the sternum anteriorly. Instead, ribs 8-10 attach to the cartilage of the rib above, while ribs 11 and 12 are free floating ribs not attached anteriorly at all. This lack of direct anterior attachment is why ribs 8-12 are called “false ribs.” While the first seven pairs of ribs attach both posteriorly to the vertebrae and anteriorly to the sternum, the false ribs only attach posteriorly. Their indirect anterior attachment to the sternum is why anatomists call them “false.” Understanding the difference between true and false ribs is important when studying rib anatomy and identifying injuries or diseases that may impact specific ribs.
Floating Ribs
The last two ribs, numbers 11 and 12, are called the floating ribs. Floating ribs are not directly attached to the sternum at all 1. Unlike the true ribs that are attached to the sternum by costal cartilage, and the false ribs that are indirectly attached to the sternum by costal cartilage fusing together, the floating ribs are not attached to the sternum at all. They terminate in the abdominal musculature and are the only ribs that do not form the curvature of the thoracic cage anteriorly. The floating ribs are relatively small and have a single facet on the head that articulates with the vertebrae 2.
Rib Curvature
The ribs demonstrate a varying degree of curvature along their length. The curvature is greatest in the upper ribs and steadily decreases down the rib cage:
- The first ribs show the greatest degree of curvature as they wrap from the back around to the front of the chest.
- The middle ribs (ribs 5-9) have a moderate curvature.
- The lower ribs (ribs 10-12) have only a slight curvature.
The posterior part of the rib shaft, near the vertebrae, is directed superiorly and laterally. The anterior region angles more sharply downward. This angulation forms the costal angle of the rib. The most superior two ribs join the sternum directly and do not display an obvious costal angle.
The purpose of the rib curvature is to increase chest cavity volume. When the diaphragm and intercostal muscles contract during inspiration, the curvature of the ribs allows them to move up and outward. This expands the overall thoracic dimensions, creating negative pressure for air to fill the lungs. The upper rib pairs show greater excursion during breathing.
Drawing the Rib Cage
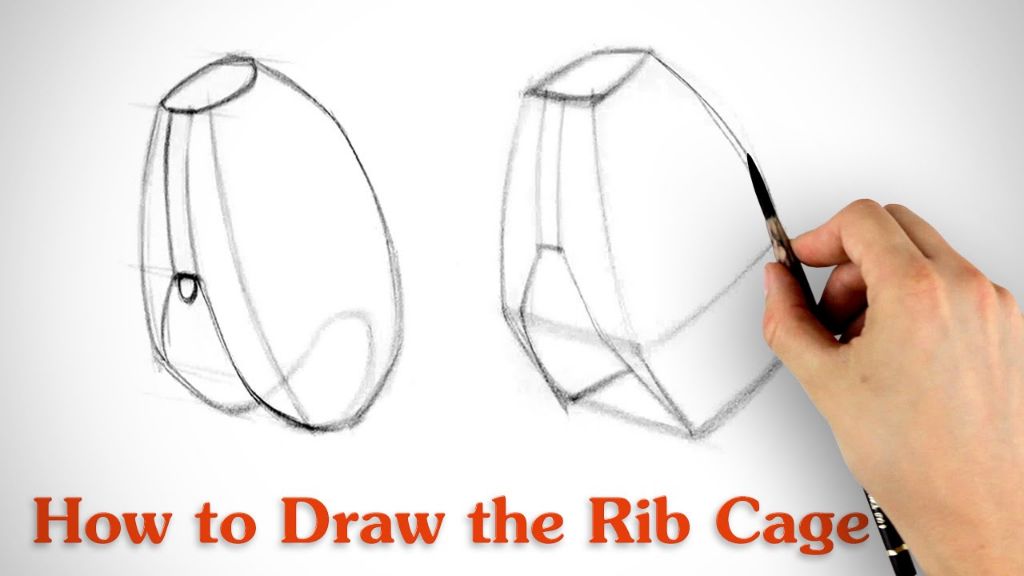
The rib cage can be simplified as a box shape when first sketching it out. Start by drawing a rectangle or square for the core shape. Make sure to leave room at the top for where the shoulders will sit. According to this tutorial on Pinterest, lightly sketch the angles first before building up the form.
To integrate the rib curvature, draw curved lines starting from the center of the chest outwards. The upper ribs should curve down more, while the lower ribs have a flatter curve. The illustrations on iStock are useful for visualizing the shape of the full rib cage. Remember to round out the overall form rather than leaving straight edges.
Once the basic shape is mapped out, you can erase your guide lines and refine the curves. Check anatomy references to ensure accuracy before finalizing the line work.
Adding Muscle
The intercostal muscles fill the intercostal spaces between the ribs. There are three layers of intercostal muscles: the external intercostal, the internal intercostal, and the innermost intercostal muscles. According to the Kenhub article on intercostal muscles, the external intercostal muscles are located just deep to the skin and superficial fascia. They help raise the ribs during inhalation. The internal intercostal muscles lie just deep to the external intercostals and help depress the ribs during exhalation. The innermost intercostal muscles are the deepest layer and assist the internal intercostals during forced exhalation. Together, the intercostal muscles play an important role in breathing by facilitating the expansion and contraction of the rib cage.
Shading
Shading is important for adding realism and dimension to your rib anatomy drawing. Consider where your light source is coming from and how that will cast shadows on the ribs. Typically, the light will be coming from above, so the top edges of the ribs will be highlighted while the underside will be in shadow.
To shade the ribs, start by indicating the shadows with soft, light pencil lines. Areas where the ribs overlap will generally be darker. Add some hatching lines to build up the shading, keeping your strokes following the contour of the ribs. Make the shadows directly underneath each rib the darkest. The shadows on the side facing the light should remain very light.
Work your way through the rib cage, paying attention to how the light wraps around the cylindrical shape of the ribs. The shadows will gradually lighten towards the highlighted top edge of each rib. Blend the shading with a tortillion or tissue to create smooth gradations. Study realistic drawings of the rib cage to see how light falls across the complex forms and cast shadows.
Practice Exercises
The best way to improve your rib anatomy drawing skills is through focused practice. Here are some step-by-step exercises to try:
1. Draw the rib cage from different angles
Start by drawing a basic rib cage straight on, then try angling it, drawing it from the side, back, or front. This helps you visualize the 3D structure of the ribs from all perspectives.
2. Sketch the rib cage on top of reference photos
Find reference photos of bodies with a visible rib cage. Lightly sketch the ribs you can see directly on top of the photo. Check your drawing against the photo to see if you have the shape and angles right.
3. Draw rib cages of different body types
Practice drawing rib cages on figures with different body shapes and sizes. The rib cage moves and adjusts slightly on every unique figure.
4. Quick gesture drawing
Do 30 second to 2 minute gesture drawings focusing just on the rib cage. Work on capturing its essence quickly without worrying about detail. Great warm up exercise!
5. Add ribs to figure drawing
Incorporate the rib cage into your figure drawing practice. Focus on how it fits into the body’s form as a whole.
With regular practice of the rib cage in various contexts, your comfort and skill in drawing ribs anatomically will improve dramatically.