How Do You Make Simple Things Out Of Clay?
Clay is a versatile, easy to work with material that enables both beginners and experts to create simple objects and intricate works of art. Clay crafts date back to ancient times, with archaeological evidence of clay pottery made over 20,000 years ago. Clay’s malleability, affordability, and accessibility have made it a popular artistic medium across cultures worldwide.
While ceramic masters can make complex sculptural pieces, clay lends itself equally to simple, minimalist creations. With some basic techniques, simple tools, and a few inexpensive materials, anyone can shape clay into basic functional and decorative objects. The process provides a fun, engaging creative outlet and the reward of crafting handmade items infused with personal flair and meaning.
Needed Supplies
To make simple clay projects, you’ll need a few basic supplies:
Clay – The type of clay you choose will depend on your project. Polymer clay is very easy to work with for basic sculpting and doesn’t require firing. Air-dry clay dries hard at room temperature. For more advanced sculpting that requires durability, choose ceramic clay that can be fired in a kiln. Consider the color as well.
Sculpting Tools – You’ll want an assortment of basic sculpting tools like stainless steel or wooden fettling knives, loop tools, rib tools, wooden modeling tools, and clay shapers. Ball styluses help imprint lines and textures. Sponges add texture. Needle tools create holes and fine details.
Paint – Acrylic paints work best for hand-painting fired ceramic pieces. Make sure to get paint formulated for ceramics. Choose gloss or matt sealants too.
Glaze – For pieces made with ceramic clay, you’ll need to apply a food-safe glaze before firing in the kiln. Consider transparent, opaque, glossy, or matte finishes.
Preparing the Clay
Before you can start sculpting with clay, you need to prepare it properly. Here are some key techniques for getting your clay ready to work with:
Kneading
Kneading clay is one of the most important preparation techniques. Start by cutting off a workable sized piece of clay from your block. Flatten the clay by pressing down firmly with your palms. Then, using the heels of your hands, push the clay away from you while folding the far edge over toward yourself. Give a quarter turn and repeat the kneading process. Do this for 5-10 minutes until the clay is soft, pliable and has an even consistency.
Wedging
Wedging is another essential preparation method. On a clean surface, form the clay into a ball. Use your palms to push down into the center while pulling the edges up to the top to form a cone shape. Press the coned clay back into a ball shape and repeat, rotating as you wedge. This removes air pockets and further blends the clay. Wedge for 1-2 minutes.
Conditioning
Conditioning brings clay to its optimal moistness and plasticity for sculpting. If clay is too wet, let it air dry somewhat or wrap in plastic. If too dry, add water a few drops at a time while kneading. The clay should be smooth, flexible and moldable without sticking or cracking. Test consistency by sculpting a small sample shape.
Sculpting Basics
When working with clay, there are four basic techniques you’ll use to start sculpting your creations:
- Rolling coils – Take a ball of clay and roll it between your palms or on a flat surface to create long coil shapes. Coils can be used to create pots, vases, bowls, etc. Pinch the coils together and blend with water to join them.
- Rolling slabs – Use a rolling pin to roll out flat, even slabs of clay. Slabs are useful for making flat items like tiles or plates. Score the edges before joining slabs.
- Balls – Form clay into balls by rolling it between your palms. Balls can be used for round shapes like beads or smooth sculpted areas.
- Smoothing seams – Wherever two pieces of clay join, blend and smooth the seams together. Use your fingers, a bit of water, or clay sculpting tools. This will create a continuous surface.
Master these basic techniques first before moving on to more complex creations. Taking time to perfect the fundamentals will lead to better results.
Sculpting Vessels
Shaping clay into hollow containers like bowls, cups, and vases is a great way to get started with sculpting. Vessels allow you to practice fundamental techniques while creating beautiful and functional pieces. When sculpting vessels, focus on achieving an even thickness throughout the walls. Too thin and your piece may collapse; too thick and it will be heavy and require more drying time.
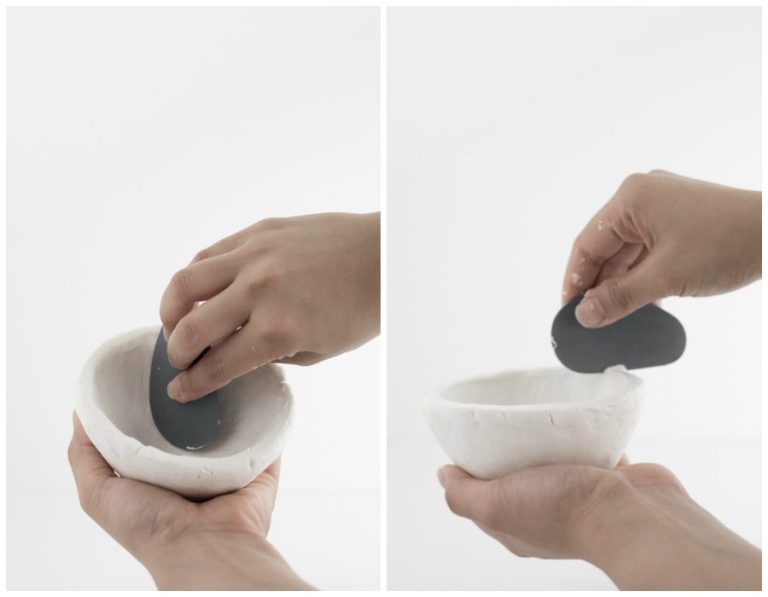
For a simple bowl, begin with a ball or disk of clay. Use your thumbs to push into the center while rotating the clay to shape the inside. Then smooth and refine the walls and rim with your fingers or some simple sculpting tools. For a footed bowl or plate, leave extra clay at the base to form the foot. Use a ribs tool to define the foot then blend it into the base.
Cups follow a similar process but may include handles. Once the basic cup form is made, create and attach handles by rolling clay into a sausage shape then gently blending the seam into the cup walls. For spouts, roll a tapered teardrop shape and cut open using a knife or fettling tool before attachment.
Vases have a narrower opening and elongated body. Start with a ball or cylinder shape for the base then use your fingers to stretch and draw up the sides. Refine the contours to achieve a pleasing profile before smoothing the surface with a ribs tool. Consider making the base heavier than the top to avoid tipping when used with real flowers.
Take care not to make vessel walls too thin. Allow adequate drying time before firing to prevent cracking. When sculpting vessel forms, clay thickness, refinement, and drying are key factors for success.
Sculpting Figures
Sculpting figures out of clay allows you to make miniature people, animals, and abstract shapes. To sculpt a person or animal, start by making a basic shape for the body and head. You can make coils for arms and legs, and attach them to the body. For a standing figure, use twisted coils of clay or rolled balls of clay to make a sturdy base.
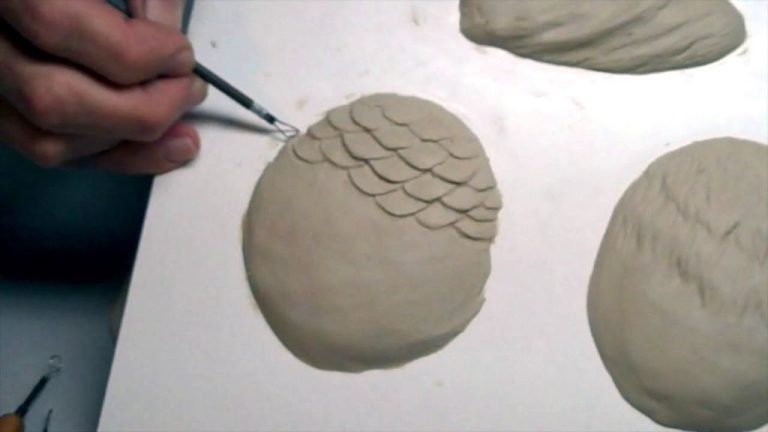
Add basic shapes for other body parts like ears, tails, snouts, etc. Then use clay sculpting tools to refine the shapes and add details. For people, use different sized balls of clay to shape the eyes, nose, mouth, etc. Use needle tools to add hair, fur, scales, feathers, patterns, etc. Sculpt clothing, accessories, or other decorations to bring your figure to life.
For abstract shapes, let your imagination guide you. Make free-form coils, pull and pinch the clay into flowing shapes, and experiment with texture using your tools. Abstract figures don’t have to resemble anything realistic. The sculpting process itself can inspire interesting one-of-a-kind forms.
Take your time perfecting your figure. Clay can be added or removed as needed. Be patient, and pay attention to proportions and balance. Sculpting figures just takes practice. Over time you’ll gain skill in shaping detailed figures that come to life in clay.
Adding Texture
One of the most enjoyable parts of working with clay is experimenting with different techniques to add visual interest and texture to your sculptures. While smooth, polished clay has an appeal, pieces with carved, imprinted, or embossed textures often have more character and depth. There are countless ways to creatively manipulate the clay surface – here are some top techniques to try:
Imprinting
Imprinting involves pressing objects into the clay surface to leave an imprint. Things like leaves, lace, coins, shells, or textured fabrics work great. Press the object gently but firmly into the soft clay, taking care not to distort the surrounding area. When removed, a detailed negative impression will remain. Imprinting adds decorative detail and makes the clay look less smooth and uniform.
Grooving
Grooves and lines scratched into the clay with tools create stripes, crosshatch patterns, or contours. Mark the surface with wooden skewers, needle tools, loop tools, or anything with a sharp point. Grooves work well to suggest features on figures, create borders, or carve abstract designs. Varying the depth and closeness of the lines yields different effects. Grooving brings a handmade, earthy look.
Incising
Incising involves cutting lines or shapes into the clay surface with sharp tools. This removes clay rather than simply imprinting it. Try an X-Acto knife, clay tool, or anything similar. Cut shapes like stars, spirals, leaves or symbols into the clay. Incising creates deep textures and patterns in the surface. Let the carved areas remain sunken, or press clay back into them so they remain visible but not deeply cut.
Drying and Firing
After sculpting your clay, it’s important to let it dry properly before firing. There are a few things to keep in mind during the drying process:
- Air dry clay thoroughly. Place your finished sculptures in a warm, dry area out of direct sunlight. Letting clay dry too quickly can cause cracking.
- Consider using a dehydrator or food dehydrator to speed up drying time. Just be careful not to dry the clay too quickly.
- Check for dryness before firing. The clay should be dry to the touch with no visible moisture.
Once clay is fully dry, the next step is bisque firing. Bisque firing further hardens the clay by heating it to approximately 1600-2000°F. When bisque firing:
- Use a kiln designed for ceramics. The temperature must reach over 1000°F.
- Heat slowly, around 200°F per hour. Rapid temperature changes can cause cracking.
- Hold at peak temperature for 30-60 minutes.
- Cool slowly in the kiln, around 150°F per hour.
After bisque firing, clay can be glazed and then glaze fired. Glaze firing melts the glaze onto the clay around 2000-2300°F. Tips for glaze firing:
- Apply glazes appropriately for the firing temperature.
- Fire according to the glaze manufacturer’s specifications.
- Heat and cool at a controlled rate to prevent glaze defects.
- Test glazes beforehand to ensure desired results.
With proper drying, bisque firing, and glaze firing, you can achieve beautiful, durable finished clay pieces.
Applying Color
Adding color through paints, glazes or stains is an optional but fun way to finish off your clay creations. Here are some tips on coloring clay projects:
Paints – Acrylic paints work well on dried clay as they adhere to the surface and are flexible. Make sure to use acrylics formulated for ceramics. Apply with a brush and seal with a finishing spray or top coat glaze.
Glazes – Glazes come in various finishes like glossy, satin, or matte. They chemically interact with clay when fired in a kiln to create color. Glazes can be tricky for beginners to apply evenly. Use several thin layers rather than one thick coat.
Stains – Stains are very easy to apply as they soak into the clay. Multiple coats will intensify the color. Similar to paint, seal stains with a finishing spray or glaze before firing. Stains work best on textured areas versus smooth surfaces.
Experiment with different options to find your preferred coloring techniques. The possibilities are endless when adding beautiful, unique colors to your handmade clay creations.
Finishing Touches
Once your clay sculpture is complete, there are a few final steps to take before displaying your artwork. Properly sealing and protecting your clay creation will help it last for years to come.
Sealing
Applying a sealant is highly recommended for any clay sculpture. Sealants protect the clay from moisture, dust, and potential damage. There are a few options when it comes to sealants:
- Polyurethane is a common sealant for protecting clay. It dries clear and provides a durable, protective coating.
- Mod Podge is an easy-to-use decoupage glue that can also be used to seal clay sculptures.
- Clear acrylic sprays are made specifically for sealing clay and ceramics.
Apply 2-3 thin coats of your chosen sealant, allowing each coat to fully dry before adding the next. This ensures complete, even coverage.
Displaying
One of the joys of sculpting with clay is being able to display your finished pieces. Here are some tips for beautifully showing off your clay creations:
- For functional items like bowls, mugs, or vases, you can proudly display them around your home by placing them on shelves, tables, or in cabinets.
- Mount smaller sculptures on bases or stands to help elevate them.
- Protect fragile sculptures by displaying them behind glass or acrylic cases.
- Make use of walls and shelves to show off your collection of clay art.
- Improperly sealed pieces are best kept behind closed cabinets or drawers.
With the right sealant and display placement, your clay sculptures will look fantastic for many years to come. Be sure to proudly exhibit your clay art for all to enjoy!