Sculpting Mastery Unlocked: Advanced Clay Techniques
Sculpting is a unique art form that allows artists to bring their visions to life in three dimensions. Master sculptors utilize a range of techniques to manipulate materials like clay, wax, stone, metal, and more into intricate works of art. While beginners tend to stick to basic sculpting methods, advanced techniques open up new creative possibilities for more experienced sculptors.
Learning advanced sculpting skills unlocks the ability to create more dynamic, detailed, and realistic sculptures. Techniques like texturing, armature building, joining, surfacing, and mold making help take sculptures to the next level. Mastering these methods allows artists to bring their wildest imaginations into physical form.
This guide will provide an in-depth look at advanced sculpting techniques using clay as the primary material. It will cover specialized tools, materials, and methods that allow artists to create more ambitious and professional-level sculptural works. Learning these advanced techniques can help unlock greater creativity, precision, and realism in sculpting. The skills covered will aid sculptors in moving beyond basic sculpting and achieving true mastery of their craft.
Tools and Materials
Clay sculptors utilize a wide range of specialized tools and materials to bring their artwork to life. The type of clay used is a key consideration, as properties like hardness, flexibility, and texture will determine what can be created. According to FireflyArt Supplies, popular clay types include polymer clay, oil-based clay, ceramic clay, and plasticine clay, each with unique characteristics. Polymer clays like Sculpey and Fimo are great for fine details, jewelry, and small sculptures. Oil-based clays like Monster Clay are excellent for armatures and detailed sculpting. Ceramic clays are designed for firing pieces in a kiln, creating durable finished works. Plasticine clays are reusable and never dry out.
Sculptors use a variety of hand tools to manipulate the clay. Metal sculpting tools like loop tools, ribbon tools, and dental tools create texture and refine details. Knives, cutting wires, and clay shapers form shapes and separate clay. Roller tools smooth surfaces and flatten slabs. Wooden tools like sculpting sticks, ribs, and wedges add unique textures. Brushes apply liquids like mineral spirits or acrylic mediums. Specialized modeling stands, plinths, and turntables provide stability while working. Having the right selection of high-quality tools suited for the clay medium is key for unlocking advanced techniques.
Armatures and Support Structures
The purpose of an armature in sculpture is to provide underlying support for the clay or other sculpting material. Armatures allow the artist to create a pose with the framework first before adding the surface detail.
Armatures can be made from different materials like wire, wood, metal rods or mesh. Wire armatures made of aluminum or steel alloy wires are common for small sculptures. They allow flexibility in posing. Wood armatures work for larger pieces, providing rigid support. Metal rods or mesh can also be used.
Armatures are essential when sculpting figures to enable realistic poses that defy gravity. They also aid in proportion and measuring comparative sizes. For abstract sculptural forms, armatures assist in achieving balance and structural integrity.
In summary, armatures enable the core framework that gives strength and form to a sculpture. Choosing the right armature materials and design is key before starting the detailed sculpting process.
For more on armature systems designed for figures, see Figure Armature Systems.
Textures and Surface Effects
Texturing the surface of a sculpture can add realism, interest, and artistic flair. There are many techniques for creating realistic and abstract textures in clay. Impressing objects into the surface is one easy way to quickly add texture. Items like lace, burlap, netting, leaves, seashells, buttons, and nuts can create interesting impressions. You can also use sculpting tools to incise lines, scratches, hatch marks, etc. into the surface. Carving and engraving clay while leather hard produces crisp details.
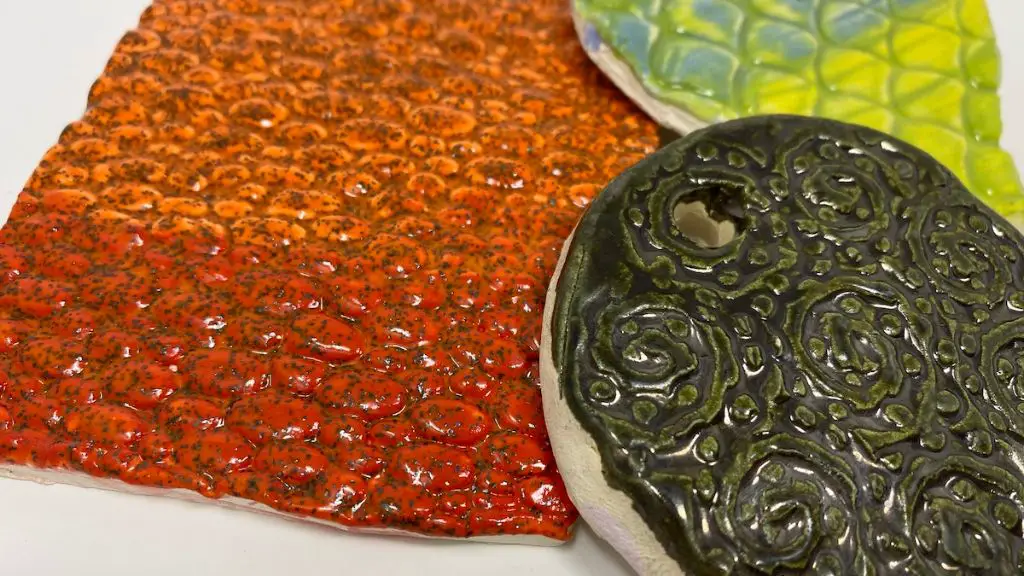
For softer textures, try stippling the surface using a brush, sponge, or crumpled paper. You can build up layers of colored slips or washes to suggest age and wear. Adding bits of bark, twigs, rice, beans, beads, etc. creates visual interest. To convey hair, fur, or feathers, push strands of hemp, sisal, or raffia into the clay. The additive technique of attaching items extends sculptural possibilities. Affix pieces of fabric, leather, rope, sticks, shells, or jewelry using slip.
With planning, clay can be molded over various materials to create the illusion of texture. Drape wet clay over corrugated cardboard, plastic netting, or scouring pads before removing them when leather hard. Experiment with combining and layering techniques to produce innovative effects full of depth and realism. Referencing photos of actual textures helps mimic surfaces accurately.
Joining and Construction
When sculpting complex forms in clay, multiple pieces will need to be joined together. Proper joining techniques are critical for ensuring the structural integrity of a sculpture. There are a few key methods for joining clay pieces:
Wet joining is one of the most common techniques. This involves scoring or roughening the surfaces to be joined, wetting them with water, slip or clay liquid, and then pressing them together firmly. The water helps the clay particles bond across the join. As noted on The Two Rules of Joining Clay, wetter clay joins more easily.
Another method is slip joining. This uses liquid clay or ceramic slip as an adhesive to join clay surfaces. The slip creates a strong bond as it dries. Slip can be used in combination with scoring the clay for even stronger joins, as described on Instructables.
Armatures, internal supports, or joints made of wire, wood or other materials can also assist in assembling complex forms. These provide structural reinforcement, especially for extended limbs ordelicate parts of a sculpture.
Proper construction techniques, like using adequate join thickness and bracing, are key to creating durable clay sculptures. Allowing joins to dry thoroughly before moving or handling the sculpture will help prevent breakage and cracks.
Weight and Balance
Proper weight distribution is crucial for creating a freestanding sculpture that can stand on its own without toppling over. When designing your sculpture, consider placing more mass toward the base to lower the center of gravity. Wider stances and lower centers of gravity contribute to greater stability.
The relationship between the sculpture’s weight and balance will determine how sturdy it is. Heavier pieces at the bottom act as a counterbalance to the top. You can test balance by resting the sculpture on your finger – it should balance upright when set down. Avoid any weak points or thin joints that could cause the piece to twist or snap from the weight.
Kinetic balancing sculptures introduce movement, so the effects of gravity and momentum must be taken into account. Carefully calibrate the weight distribution so that the mobile parts can swing freely and return to equilibrium. Test kinetic sculptures gently to observe how the balance shifts. Refer to resources like the Exploratorium for more physics principles behind balancing sculptures.
Details and Refinement
Bringing a sculpture to life through meticulous detailing is what separates an amateur work from a masterpiece. Refining forms to add subtle contours, expression, and personality requires patience and precision.
Start refining details only after the major forms and anatomy are established. Use calipers or proportional dividers to take measurements and ensure symmetry. Pay special attention to delicate areas like hands, eyes, lips, and other facial features that convey emotion and likeness.
Consider the viewing angles of the sculpture. Prioritize details that will be most visible. Smooth out fingerprints and imperfections for a clean, polished look. Define shapes with strategic grooves, striations, wrinkles, pores, or other naturalistic textures as needed.
Be judicious with details and avoid overworking the sculpture. Know when to stop for optimal impact. Let some forms remain partially rough or obscured to create visual interest. Master sculptors balance refinement with restraint to create lifelike works that engage the viewer ([1], [2]).
Mold Making and Casting
Creating molds and casting allows sculptors to reproduce numerous copies of their original sculptures. There are several advantages to casting from molds:
1. Replicating an original sculpture without needing to fully recreate the sculpting process each time. Molds enable creating exact duplicates or multiples of a sculpture.
2. Casting in different materials like resin, concrete, plaster, wax, rubber, plastic, metal, etc. This opens up various artistic options beyond the original material.
3. Achieving complex forms that might be difficult to sculpt directly. The mold captures intricate details from the original.
4. Producing affordable copies for sale or distribution. Cast pieces can be made and sold at lower costs than individually sculpted works.
5. Durability and reproduction over time. Molds can last through multiple castings, enabling reproducing sculptures over long periods.
There are several techniques for creating molds:
– Plaster molds involve covering an original sculpture in damp plaster strips, letting it set, then carefully removing the hardened mold. These molds capture excellent surface detail. (The Monster Makers)
– Silicone molds utilize liquid silicone poured over an original sculpture and allowed to cure into flexible and resilient molds ideal for casting resin or wax. Silicone molds can capture fine details.
– Two-part or matrix molds are made using rigid walls to contain liquid mold material around a sculpture. These enable complex mold geometry. The mold material cures around the original.
– Silicone combined with mother molds uses a flexible silicone mold with a rigid outer shell for support and durability. The silicone captures details while the mother mold reinforces the form.
Overall, creating high quality molds enables accurately reproducing sculptures in quantity and different materials. Casting expands possibilities for distributing and showcasing original sculpted works.
Painting and Finishing
Painting and finishing clay sculptures is an important final step to consider when creating your artwork. The painting and finishing process can enhance the sculpture’s visual appeal and protect the surface from damage over time. When working with polymer or ceramic clay, acrylic and water-based paints are recommended as they adhere well to the clay surface. Oil or enamel paints are not suggested as they may not properly bond with the clay.
There are several techniques to approach painting clay:
- Apply even coats of acrylic paint to the entire surface with a brush. Multiple thin layers are better than one thick coat. Allow each layer to dry fully before adding the next.
- Use acrylic paints diluted with water to create custom washes. Apply in layers to build up depth and color variations.
- Dry brushing involves dipping a paint-dipped brush on a paper towel to remove excess paint, then lightly brushing over raised edges and textures. This creates a weathered, accentuated look.
- Sponge painting involves dabbing on paint with a makeup sponge, creating a mottled texture.
Glazing involves brushing on a transparent acrylic glaze over an already painted surface. Glazes enhance depth and shadows. Multiple glaze layers in different colors can create rich effects. Alcohol inks also work nicely as glazes.
Staining with acrylic paints or inks can enhance realism on sculpture surfaces like wood or stone. Apply stains in layers, letting each application dry before adding the next one. Distress stains with fine sandpaper or steel wool between layers for a weathered look.
Sealing the painted clay surface is highly recommended. Polyurethane or epoxy resin coatings provide a protective barrier against moisture and handling damage. Apply multiple thin layers for best protection, allowing each coat to fully cure between applications.
With the right painting supplies and techniques, you can take your polymer clay creations to the next level. Finishing a sculpture properly will enhance its visual appeal and preserve it for years to come.
Conclusion
Sculpting takes time, patience, and practice to master. In this guide, we covered a range of advanced sculpting techniques using polymer clay that can help take your sculptures to the next level. From building sturdy armatures to adding realistic textures and details, each technique builds on the last to help create stunning, professional-looking sculptures.
Practicing each technique repeatedly is key to truly mastering them. Start with simple shapes and forms, then slowly work your way up to more complex sculptures. Pay attention to the look and feel of your clay, and how it responds to your tools and handling. The more experience you gain working the clay, the better sense you will have for how to manipulate it to create the effects you desire.
Don’t be afraid to experiment and take risks with your clay. Some of the most interesting effects come from playing around with different tools on test scraps. Combining multiple techniques together can also lead to innovative results. With frequent practice and expanding your skills over time, you will unlock new levels of sculpting mastery.