What Do I Make With Air Dry Clay?
Air dry clay is a modeling material that dries naturally and does not require baking. It is made from a mixture of clays, fillers and binders that allows it to harden when the moisture evaporates into the air (“Learn About Air Dry Clay”, 2019).
Compared to other clays like polymer clay or pottery clay, some pros of air dry clay are that it is lightweight, easy to work with, and does not require any special tools or ovens. The main con is that air dry clay is not as durable or strong as clays that get baked at high temperatures (“What’s The Main Difference Between Air Dry Clay And Polymer Clay”, 2021).
There are a few main types of air dry clay:
- Modeling clay – This is the most common and versatile. It is smooth, pliable, and good for detailed sculptures.
- Paper clay – Made with paper pulp, this is lightweight and often used for beads or ornaments.
- Self-hardening clay – This type firms up faster than modeling clay, so is good when more structure is needed.
Air dry clay is a fun, accessible sculpting material for crafters of all ages and skill levels.
Making Simple Shapes and Sculptures
Air dry clay is a versatile material that can be shaped into a variety of forms. Here are some basic techniques for sculpting simple shapes and textures:
Basic Shaping Techniques
Balls – Roll pieces of clay between your palms or on a flat surface to create spheres. Smooth over cracks or seams by rubbing gently.
Coils – Roll clay into snake-like coils, then bend, curl, and attach together to build forms. Pinch ends to blend coils into each other. Let dry partially before handling to avoid cracks (Adelepo).
Slabs – Roll out clay with a rolling pin to make even flat sheets. Cut shapes with cookie cutters or a knife. Press edges together to construct forms.
Smooth Sculpting Tips
Work in thin layers, allowing each to partially dry before adding more. Thick pieces may crack while drying. Rub with a bit of water to smooth seams and soften clay (Montmarte).
Adding Textures
Press molds, stamps, stencils, or found objects into clay to create patterns. Use a looping tool or toothpick to scratch lines. Pinch, ruffle, or indent clay with fingers or tools to produce organic textures.
Creating Miniatures
Miniatures are a fun and creative way to use air dry clay. You can make miniature versions of almost anything – people, animals, food, furniture, vehicles, buildings, and more. Here are some tips for crafting great miniatures with air dry clay:
Pay attention to scale and proportion when making miniatures. The sizes and shapes of different elements need to be in the proper ratio to each other. For example, a miniature person’s head should be roughly 1/7th to 1/8th the size of their whole body.
Consider whether you want a realistic or caricature style for your miniatures. Realistic miniatures aim to closely recreate the real-world object, with careful attention to detail and proportions. Caricatures exaggerate certain elements, like large heads or elongated limbs, for a cartoonish effect.
Use basic shapes like balls, coils, teardrops, and cubes as building blocks for miniatures. Attach these shapes together to form detailed objects. Add smaller shapes for miniature accessories or details.
Roll very thin coils or slabs of clay for miniature limbs and appendages like arms, legs, tails, etc. Cutting long thin strips can also work.
Use simple tools like toothpicks, pins, sewing needles, and cocktail sticks to add fine details to miniatures like eyes, mouth, buttons, scales, leaves, etc.
Let gravity help smooth and blend clay on miniatures as you work. Allow damping clay to slowly drip down and fill gaps between shapes for a seamless look.
Focus on getting the right overall forms and proportions for miniatures. Don’t worry about adding all details in the initial shaping stages. Refine proportions first, then add finer details.
Air dry clay is perfect for miniature food items. Roll tiny balls for foods like grapes, oranges, berries, etc. Cut thin slices for miniature meats and cheeses.
Miniature dishes, cookware and silverware are fun clay projects. Use clay slabs for plates and bowls, pinch pots for cups, and small coils for cutlery handles.
With patience and practice, you can create amazingly detailed miniatures with air dry clay. Let your creativity guide you as you craft tiny works of art!
Making Jewelry and Ornaments
Air dry clay is an ideal material for making jewelry and ornaments. The clay is lightweight when dry, making it comfortable to wear. It’s easy to cut, mold, and shape, allowing you to create unique pendants, beads, and charms. Here are some key techniques for making clay jewelry and ornaments:
For pendants, roll or cut the clay into your desired shape. Use cookie cutters, molds, or freehand your design. Add texture by pressing designs into the clay. Make a bail by poking a hole before the clay is dry or glueing on a finding after it has dried. Bake polymer clay pendants following package directions.
To make beads, roll small balls or teardrops of clay between your hands. You can make them smooth or add patterns and textures. Use a skewer to pierce holes for stringing before baking polymer clay beads. Allow air dry clay beads to dry completely before stringing.
Craft charms by hand sculpting simple shapes like hearts, stars, animals, initials, etc. Cut shapes using cookie cutters. Press designs like flowers into the clay. Insert a charm finding before baking polymer clay. Glue findings onto air dry clay after drying.
For smooth finishes, sand air dry clay lightly once dry. Buff polymer clay before baking with a soft cloth.
Seal air dry clay pieces with a sealant like polyurethane, glaze, or varnish once fully dry. This protects the clay and gives a nice finish. Bake polymer clay according to package directions to harden the clay.
With some simple tools and techniques, you can create beautiful, customized jewelry from air dry clay. The possibilities are endless!
Crafting with Nature
Air dry clay provides a great opportunity to involve nature in crafting. Using items found outdoors like leaves, flowers, and sticks, you can add realistic textures and imprints to clay sculptures and projects. Pressing objects gently into clay captures their shape and form. Clay picks up even delicate veins in leaves and petals in flowers.
Some options for nature imprinting include:
- Leaves – Their veins and edges leave beautiful impressions. Leaves like maple or oak work well.
- Pinecones – The pointed pattern embosses nicely in clay.
- Seashells – Perfect for ocean themes, seashells stamp lovely natural whorls.
- Sticks – Create line designs by pressing sticks into clay. Try different thicknesses.
- Seeds and nuts – Fun for texture and adding visual interest.
When working with nature, you can keep designs realistic by using accurate colors and shapes. But it’s also enjoyable to take an abstract approach, using nature items simply for their textures and patterns. Let nature spark your creativity, while keeping the focus on fun! Source: https://thepinterestedparent.com/2016/07/clay-rock-nature-crafts/
Making Magnets
Air dry clay is a fun and easy material to make magnets from. The clay can be easily shaped into geometric forms or creative sculptures and painted with acrylics once dry. Air dry clay magnets allow you to customize your fridge and turn it into a canvas for displaying art, memories, or reminders.
To make basic magnets, roll balls or cut shapes out of air dry clay. Let the forms fully dry and harden before painting. Acrylic craft paints work well for adding color and designs. Make sure to seal the paint with a clear acrylic sealer so the paint doesn’t chip.
For more durable magnets, incorporate metal elements like washers, nuts, bolts, craft metal, cut up sheet metal, or broken jewelry. Press these items into the backside of the air dry clay shape before drying to create a magnetic surface. Allow plenty of the metal to show through to maximize magnetism.
Air dry clay magnets may require a clear gloss sealer like Mod Podge to fully seal and protect them, especially if they will be exposed to moisture from hands opening the fridge. Let them cure for 24 hours after sealing to allow the finish to fully harden before putting them on your fridge.
Some fun air dry clay magnet projects include making animal shapes, letters or names to spell out words, miniature food items, abstract geometric designs, and anything else you can imagine. The lightweight nature of the clay makes it possible to create 3D magnet sculptures as well.
Decorating with Air Dry Clay
Air dry clay is a versatile material that can be used to decorate your home. From wall plaques and hangings to boxes, vases, and bowls, you can make beautiful decorative pieces. Air dry clay is lightweight yet durable, making it perfect for display.
Wall plaques and hangings are a great way to add artsy accents to your home. You can sculpt shapes, words, or designs to mount on walls or hang from the ceiling. Air dry clay is easy to manipulate into thin sheets that can be formed into plaques. Add texture, stamp designs, or layer on embellishments before painting. Let your creativity shine!
Turn air dry clay into gorgeous vessels for storing trinkets and displaying flowers. Handcrafted boxes, vases, and bowls make wonderful gifts too. Roll coils and slabs to form the structure, then refine the shape, add patterns, and smooth the surface. Accent with bits of clay, beads, shells, or sticks from nature.
Painting and sealing are final touches that bring air dry clay decor to life. Acrylic craft paint adds bold pops of color. Watered down acrylic or chalk paint create a washed look. Metallic paints give a touch of glam. Paint pens allow you to draw finer details. Lastly, seal the piece with a finish like polyurethane for shine and protection. Now display your air dry clay art with pride!
For detailed instructions on making air dry clay wall hangings, boxes, and more, check out these useful sources: 20 Creative Air Dry Clay Projects, Air Dry Clay Projects to Make at Home.
Tips and Techniques
When working with air dry clay, there are some useful tips and techniques to know that will help you avoid common issues and create better projects. Proper storage is important for preserving your unused clay. The clay can dry out, so it’s best to keep it sealed in an airtight plastic bag or container (1). To avoid cracking as the clay dries, avoid making pieces that are too thick, and allow drying pieces to dry slowly in an area with high humidity (2). Always condition the clay first by kneading before starting to sculpt. When finishing air dry clay projects, acrylic paints work very well for adding color. Using a sealant like varnish or glaze will help protect the finished piece. Sanding between coats of sealant creates a smooth finish.
Fun Air Dry Clay Projects
Kids especially love working with air dry clay to create fun and imaginative projects. Here are some of the top air dry clay projects for kids:
Top 10 kids projects
Create miniature animals like horses, dogs, cats, dinosaurs, etc. Let your child’s imagination run wild (Source). Make food items like cakes, pies, sandwiches, fruits, and vegetables out of clay. Kids can then create their own mini bakeries or markets (Source). Craft seasonal items like jack-o-lanterns for Halloween or Christmas ornaments. These make great keepsakes too.
Make DIY magnets in fun shapes that kids can paint. These make great gifts too (Source). Let kids make their own storybook characters and fantasy creatures like fairies, superheroes, mermaids etc. They can invent little clay worlds. Craft masks for costume parties or pretend play. Make DIY board games with clay game pieces.
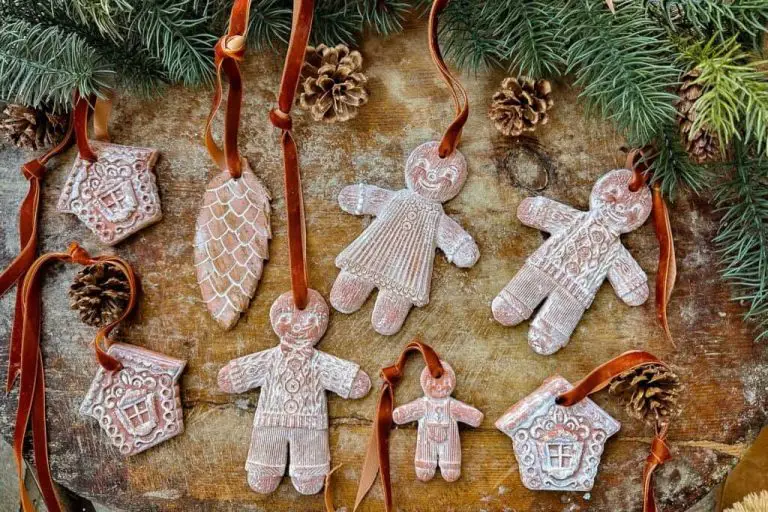
Holiday and seasonal crafts
Air dry clay lends itself beautifully to crafting holiday decorations and gifts. Make ornaments for Christmas trees or clay accents for wreaths and garlands. Craft decorative candles for holidays like Christmas, Halloween, and Thanksgiving (Source).
For Valentine’s Day, make heart-shaped boxes, picture frames, or keepsakes. Create shamrock shapes for St. Patrick’s Day or eggs for Easter celebrations. Make clay accents for Fourth of July like miniature firecrackers.
Gifts and keepsakes
Air dry clay is wonderful for making personalized gifts and keepsakes. Craft custom jewelry like pendants, beads, and earrings. Make decorative boxes, vases, cups, jewelry holders, picture frames, bookends etc. Create figurines of loved ones’ favorite characters or animals. Make plaques and wall hangings with inspirational sayings or family photos pressed into the clay.
Conclusion
Air dry clay is an extremely versatile material that can be used for various crafts and projects. As outlined in this article, air dry clay can be sculpted into simple shapes, miniatures, jewelry, ornaments, magnets, and more. With some creativity, you can make almost anything imaginable with air dry clay.
Whether you’re just starting out or have some experience, hopefully this article has inspired you with new ideas for air dry clay projects. Don’t be afraid to experiment and let your imagination run wild. Air dry clay is very forgiving and you can always redo pieces if you make a mistake. The possibilities are endless when it comes to creating with this fun medium.
For more inspiration and tips, check out the additional resources below:
- Air Dry Clay for Beginners – YouTube tutorial
- The Complete Book of Air-Dry Clay Crafting and Sculpting – book with techniques and projects
- Air Dry Clay Ideas on Pinterest – curated inspiration boards