What Do You Put On Clay To Color It?
Clay is a naturally occurring earth material consisting primarily of fine-grained minerals like kaolinite. It can be molded when wet, and then hardened through heating and drying. Coloring clay has been done for thousands of years to create decorative or functional pottery, sculptures, beads, and more. There are many reasons to add color to clay:
- For aesthetic purposes – to make a visually appealing piece of art or pottery
- To emulate materials like metal, stone, or wood
- To create color accents and designs
- To differentiate types of clay or fired finishes
Clay can be colored prior to firing, or glazes and other materials can be applied after firing to add color. Common methods to color clay include using ceramic stains, pigments, oxides, glazes, underglazes, engobes, slips, and china paints. The variety of options allow artists to achieve almost any desired color result. When coloring clay, it’s important to choose materials meant for high temperature firing so the colors will set permanently.
Paints
Paints are commonly used to color clay surfaces. There are a variety of commercially available clay paints like acrylic paints, watercolor paints, and oil paints. These paints come in many colors and finishes. Applying paint to clay is straightforward – here are some tips for using clay paints:
– Acrylic paint is a popular choice for coloring clay. Acrylics are water-based, so they clean up easily with water. They dry quickly, but you can add retarder to slow drying time. Acrylics come in matte, metallic, neon, glitter, and other interesting finishes. You can thin acrylics with water or acrylic mediums for a transparent look.
– Watercolor paints are very fluid and transparent when thinned with water. They lend a soft, diffused look on clay. However, watercolors are harder to control than opaque paints. Use controlled brushstrokes and avoid overblending.
– Oil paints give rich, vibrant colors on clay. They take a very long time to dry though. Speed drying with heat from a hair dryer or low oven. Use paint mediums to change thickness and drying time.
Some pros of using paint on clay:
– Wide range of affordable, premixed colors readily available.
– Can achieve opaque or transparent effects.
– Can mix custom colors easily.
Some cons:
– Brushstrokes may be visible if not blended thoroughly.
– Paint can obscure fine clay surface details and textures.
– Sealers may be needed to protect paint from chipping or peeling over time.
With a variety of paint types and colors to choose from, clay paint opens up many decorative possibilities. Adjusting consistency and application techniques allows for versatility in different looks and effects.
Glazes
Glazes are mixtures of minerals and compounds that melt at high temperatures to form a glassy coating on ceramic clay bodies. Glazes serve both decorative and functional purposes by adding color, texture, and waterproofing properties to finished clay pieces.
There are many types of glazes to choose from when coloring clay:
Cone 6 glazes – These glazes mature and melt completely at cone 6 (2,200°F) in an electric kiln. Cone 6 glazes are very common as they work well on both porcelain and stoneware clays. Examples are celadons, temmokus, and ash glazes.
Cone 10 glazes – Cone 10 glazes fully mature at the highest stoneware temperature of cone 10 (2,300°F). They create a smooth, glassy surface and vivid colors. Common cone 10 glazes are iron saturations, copper mattes, and Tenmoku.
Low-fire glazes – These glazes melt at lower cone 04-02 temperatures (1,800°-1,900°F). Low-fire glazes allow coloring earthenware and terra cotta clays. Types include majolica glazes, raku glazes, and lead-free commercial glazes.
Glazes must be properly mixed for consistent results. Dry glaze ingredients are combined with water in the right proportions and blended to a smooth consistency. Mixing is critical to achieve the desired effects in terms of color, surface texture, and firing outcome.
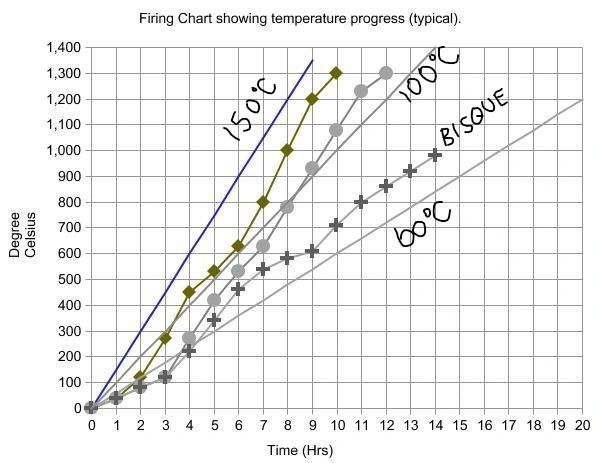
Firing glazed clay requires reaching the optimal temperature for the glaze type without over-firing. The glaze melting range and clay body maturation temperature must be compatible. Cooling rate also affects the finished glazed surface.
Some benefits of using glazes include vibrant colors not easily achieved with other coloring methods, water resistance for functional ware, and decorative visual effects like cracking or peeling.
However, glazes require specialized mixing, application, and firing knowledge. Firing mishaps can ruin many hours of work. Troublesome glaze reactions like pinholing, crawling, and shivering take experience to avoid.
Stains
Stains are another popular way to add color to clay. The main difference between stains and glazes is that stains sit on top of the clay while glazes create a glassy coating.
Stains come in liquid, powder, and paste forms. Liquid stains often contain some type of carrier like alcohol or water. Powder stains need to be mixed with water or some type of medium. Paste stains are thick and creamy.
There are several techniques for staining clay:
- Brush staining – Using a brush to apply liquid or paste stains.
- Sponge staining – Dabbing on stains with a sponge.
- Spray staining – Spraying liquid stains.
- Dip staining – Submerging the clay into the stain.
- Inlay staining – Pressing powdered stain into carved lines and textures.
Stains allow artists to build up layers of color on top of the clay. They are often used in combination with glazes to create dimensional surfaces.
Pigments
Pigments are a popular way to add color to clay. Pigments come in two main types: natural and synthetic. Natural pigments derive from organic materials like plants, insects, and minerals. Common natural pigment sources include ochre clays, iron oxides, charcoal, and turmeric. Synthetic pigments are man-made from chemical compounds. They offer a wider range of colors like bright oranges, purples, and neon hues not found naturally.
To use pigments, you mix them into liquid clay slip before molding the piece. The pigments infuse color throughout the clay body for an all-over effect. Using multiple pigments together produces blended secondary colors. Compared to surface techniques like painting, mixing pigments into clay stain provides more colorfast results resistant to chipping or scratching off.
Pigments as a coloring method offer many benefits:
- Wide range of colors, especially bright saturated hues
- Color penetrates throughout clay body
- Does not chip or scratch off like surface paints
- Can blend multiple pigments for secondary colors
- Permanent colorfast results
Inks
Inks are a popular and versatile way to add color to clay. Unlike paints and glazes that sit on top of the clay surface, inks are absorbed into the clay for striking effects.
Types of Inks
There are a few main types of inks used on polymer clay:
- Alcohol inks – Made of alcohol solvents and dye concentrates, these inks produce vibrant colors and interesting effects like blooms and marbling when dropped onto baked polymer clay.
- Acrylic inks – With an acrylic polymer base, these water-based inks are available in a wide range of colors. They work best on raw, unbaked clay.
- India inks – Formulated with carbon black pigment, india inks provide an intense black color on baked or unbaked polymer clay.
Application Methods
There are several techniques for applying inks to polymer clay:
- Dropping – Add dots and pools of alcohol inks onto baked clay for blooming effects.
- Brushing – Use a paint brush to apply acrylic or india inks smoothly onto raw clay.
- Spraying – Airbrush acrylic inks onto raw clay for a fine mist of color.
- Immersion – Submerge pieces of raw clay into diluted acrylic inks for an all-over tint.
Special Effects
Inks can produce many interesting looks on polymer clay such as:
- Marbling – Mix inks on raw clay before baking for marbleized patterns.
- Resists – Block ink absorption with wax or oil for clean resist lines.
- Blooms – Drop alcohol inks on cured clay to get bloom shapes.
- Puddling – Pool inks in depressions for realistic effects like water.
Crayons
Crayons can be an easy and fun way to add color to polymer clay. There are two main techniques for using crayons on clay:
Melted Crayon
To create a colorful design, peel the paper off crayons and break them into pieces in a disposable container. Melt the crayon pieces in the microwave or over a double boiler. Stir the melted crayon until it is one consistent color. Then pour the liquid crayon over baked clay and spread it around quickly with a brush or silicone tool before it dries. The melted crayon will pool and drip creating organic patterns.
Shaved Crayon
For more control over the design, use a grater or peeler to shave bits of crayon directly onto raw clay. Press the shavings into the clay and smooth over with your finger. When baked, the crayon will melt evenly into the clay.
Crayola is a popular brand for coloring clay since it offers a wide range of bright, pure hues. Prang and Cra-Z-Art crayons also work well. Avoid dollar store crayons which tend to have poor color quality.
Chalk Pastels
Chalk pastels are a dry media that can be used to add vibrant color to clay. They come in a wide range of bright, saturated hues. Chalk pastels work similarly to traditional chalk, but contain more pigment and less binder. This allows the color to adhere better to surfaces like clay.
There are some key differences between using chalk or oil pastels on clay:
-
Chalk pastels create a chalkier, matte finish compared to the creamy texture of oil pastels. The colors sit on top of the clay rather than blending in.
-
Chalk pastels are easy to remove if you make a mistake, unlike oil pastels which stain the clay.
-
The sticks of chalk pastels tend to break and crumble more easily than oil pastels.
-
Chalk pastels require a fixative spray after applying color to prevent smearing or transfer of pigment.
When using chalk pastels on polymer or air-dry clay, it’s important to apply a fixative first. This seals the clay and provides tooth for the pastels to grab onto. Soft or porous clays like clay may not need a fixative base coat. After applying color with chalk pastels, spray with a final fixative layer to lock in the pigment.
Alcohol Inks
Alcohol inks are vibrant, translucent inks that work well for coloring polymer clay. They are made of alcohol-soluble dyes that spread easily and create smooth color gradients. Alcohol inks are available in a wide variety of bright, saturated colors.
Types of Alcohol Inks
There are a few main types of alcohol inks used for polymer clay:
- Adirondack Alcohol Inks – Offer a wide range of colors with a glossy finish
- Jacquard Pinata Alcohol Inks – Vibrant, heavily pigmented inks good for bold colors
- Ranger Alcohol Inks – Softer translucent inks that blend smoothly
Ink Blending Techniques
Some techniques for blending alcohol inks on polymer clay include:
- Dropping inks directly on the clay and tilting the surface to blend colors
- Using a straw or airbrush to gently blow the inks across the clay
- Layering colors and dabbing with a paper towel to soak up ink
- Using an ink blending tool to smoothly merge inks
- Applying inks to yarn or foam and stamping onto the clay
Alcohol inks allow for vivid, seamless blends of color on polymer clay. Using ink blending tools and techniques can create stunning effects.
Conclusion
Overall, there are many options for coloring clay including paints, glazes, stains, pigments, inks, crayons, chalk pastels, and alcohol inks. Each method has its benefits and drawbacks. Paints provide bold, opaque colors that fully cover the clay but can obscure fine details. Glazes result in translucent colors with a glossy finish, ideal for highlighting texture. Stains penetrate the clay for a natural, variegated look. Pigments and inks are extremely versatile, working for solid fills, washes, and detailing. Crayons and pastels are great for quick, blended effects. Alcohol inks produce a marble-like finish with vibrant mixing and swirling of colors.
When selecting a coloring method, consider the look you want to achieve and how well the clay will hold the color. Test colors on clay scraps first. Apply multiple thin layers for the best coverage. Work in a well-ventilated area and seal finished pieces. With an array of coloring materials to explore, you can add beautiful, unique color effects to polymer clay.