What Is Used To Make Clay Balls?
Clay balls, also known as clay pellets or ceramic pellets, are small spherical balls made from clay that has been shaped and then fired in a kiln. Clay balls have a variety of uses, from arts and crafts projects to industrial applications.
At their core, clay balls are made by shaping moist clay into small spheres. The clay is then left to dry completely, which makes the balls hard. After drying, the balls are fired at high temperatures in a kiln, which permanently hardens them through a process called sintering. The end result is a hard, ceramic material that maintains its shape.
Clay balls are appreciated for their smooth, round shape and the ability to withstand high temperatures. Their varied uses range from helping facilitate airflow in pottery pieces to filtering applications in industrial processes. When used in crafts, they can be painted, glazed, or decorated for ornamental purposes.
Clay
The main component in creating clay balls is clay. There are several different types of clay that can be used:
-
Earthenware – This is a porous, reddish brown clay that is easily worked and fired at lower temperatures. It’s a common choice for creating clay balls.
-
Stoneware – A denser clay that requires higher firing temperatures. It results in a harder finished product.
-
Porcelain – The most refined and pure clay, firing at very high temperatures. Porcelain results in a very smooth, glass-like surface.
The different types of clays have various levels of plasticity, shrinkage, porosity, color and texture. Choosing the right clay depends on the desired characteristics and use cases for the finished clay balls.
Clay can be sourced locally in many places, or purchased commercially from ceramic suppliers. Locally sourced clay may require additional processing such as crushing, soaking, screening and blending to achieve the right consistency.
Additives
In addition to clay, other materials are often mixed in to modify the properties and workability of the clay. Some common additives include:
Grog – This is ground up fired clay that has been crushed into a powder. Adding grog makes the clay body less plastic and easier to handle and shape. It also reduces shrinking and cracking during drying and firing.
Sand – Adding sand makes the clay more porous and lighter in weight. This is useful for making planters and other objects where weight is a concern. The sand particles also help the clay dry more evenly to reduce warping and cracking.
Organic material – Things like sawdust, wood chips, or straw can be mixed into clay to increase porosity and reduce weight, similar to sand. During firing, the organic materials burn away leaving air pockets in the clay.
Paper – Shredded paper can be added to clay to achieve effects similar to organic materials. The paper burns out during firing, leaving behind pores.
Chamotte – This is calcined clay that has been fired at a very high temperature. It improves heat resistance and stability at high temperatures. Chamotte is often used in technical and refractory ceramics.
By carefully selecting additives and their proportions, potters can achieve the exact properties needed for any application. Things like grog, sand, and chamotte modify the physical structure of the clay body, while organics affect porosity and weight. The additives serve important purposes in facilitating shaping, drying, and firing clay objects.
Forming the Balls
There are several techniques for hand-forming clay into balls or spherical shapes:
Pinching – Take a lump of clay and roll it between your palms to form a basic ball shape. Then gently pinch the clay between your fingers and thumb, rotating as you go, to refine the shape into a smooth sphere.
Coiling – Roll clay into long coil shapes. Arrange the coils in a circular pattern, gradually building upwards in a spiral. Blend the coils together from the inside, smoothing with your fingers, until a solid ball forms.
Slab Building – Roll out clay into flat slabs using a rolling pin. Cut circles out of the slab using circular cookie cutters or freehand. Join and blend the edges together with slip to form a hollow ball shape.
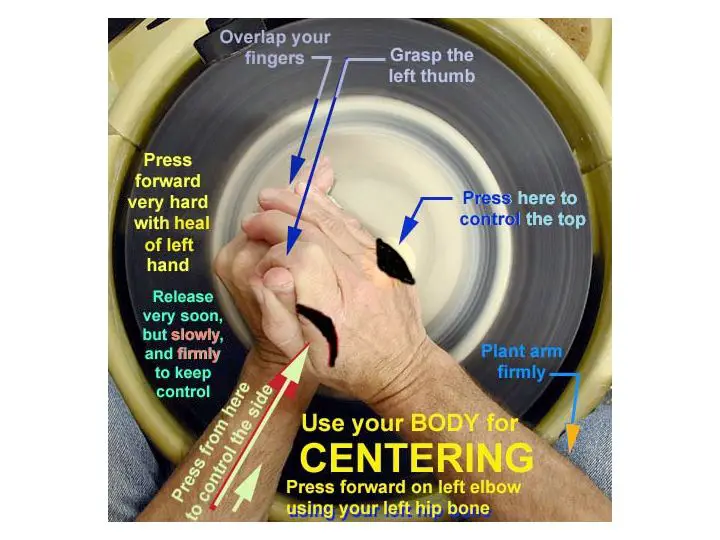
Throwing – Centering clay on a pottery wheel and use hands to shape it into a sphere as the wheel spins. Carefully control the speed and pressure while maintaining an even, spherical form.
The key for any hand-forming method is working slowly and gently to prevent cracking. Letting partially formed clay balls sit under plastic wrap between steps allows moisture to equalize and reduces stress.
Drying
After the clay balls are formed, they need to be dried before firing in a kiln. Proper moisture levels are critical for the drying process. Drying the clay balls too quickly can cause cracks and breakage. The clay needs to dry slowly so moisture can evaporate evenly throughout the ball.
The clay balls should be allowed to air dry for at least a few days. Placing them out in the sun or using fans will speed up drying time. However, the drying conditions should not be too hot or arid, which can dry the exterior faster than the interior. This uneven drying can create stresses that lead to cracks.
Monitor the moisture levels carefully. Clay balls are ready for firing when they are dry to the touch but still cool. There should be no condensation or dampness on the surface. Drying times depend on factors like temperature, humidity, clay composition, and ball size. However, typical air drying can take anywhere from 3 days to 1-2 weeks before the clay balls are ready for the kiln.
Firing
Firing is the process of heating the clay balls in a kiln to high temperatures in order to permanently harden them. The temperatures used during firing can vary widely, from about 1800°F to over 2300°F, depending on the type of clay and the properties desired in the finished piece.
As clay balls are fired, several chemical reactions occur that transform the soft, pliable balls into hardened ceramics. At lower temperatures, water is driven off and oxidation begins. As the temperature increases, decomposition of organic matter takes place. At around 1100-1200°F, quartz inversion occurs, which produces uniform shrinkage. From about 1600-2300°F, sintering takes place, which fuses the clay particles together into a solid mass.
The final firing temperature has a significant effect on the characteristics of the finished clay piece. Lower temperatures (1800-1900°F) result in earthenware, which is porous and absorptive. Stoneware clays are fired between 2200-2300°F, resulting in a strong, non-porous ceramic. The highest firing temperatures over 2300°F produce porcelain, which is extremely dense and translucent.
Careful control over the kiln firing schedule, including ramp rates, temperature holds, and cooling times, is essential to prevent cracking and ensure the clay balls are properly vitrified without becoming warped or over-fired.
Glazing
Glazing is an important step in finishing clay balls and other ceramic artworks. Glazes are coatings applied to clay pieces that serve both decorative and functional purposes.
Glazes have three main ingredients: a glass former, a flux, and an aesthetic modifier. The glass former, usually silica, provides the glaze’s glassy quality. Fluxes like soda ash or borax lower the melting point of the glaze so it vitrifies at kiln temperatures. Aesthetic modifiers like colorants and opacifiers give the glaze its visual characteristics.
Glazes can be applied to bisqueware, the unfired clay after the first firing, in a variety of ways. Dipping, pouring, brushing, and spraying are common techniques. Care should be taken to get an even coat across the entire piece. The thickness of the glaze application will affect how much it melts and moves during firing.
Firing the glazed clay at high temperatures melts the glaze into a smooth glass-like coating. The glaze hardens as it cools, sealing the porous clay to make it watertight. Glazes also protect the clay body from stains and scratches. In addition, the colors and textures obtained through glazing enhances the clay’s aesthetic appeal.
Decorating
Once the clay balls have been fired, the next step is often decorating to add color, texture, or design. There are many techniques for decorating clay balls and ceramics.
One of the most common decorating techniques is painting. Acrylic and ceramic glaze paints can be used to hand-paint designs onto the surface of the balls. Paints allow for precise details and colorful designs. The balls may be painted before or after any glazing process. Another painting technique is airbrushing, which uses an airbrush tool to softly spray on paint in layers to create effects.
Carving or engraving the surface of the clay is another option for decoration. Carving tools allow artists to scratch lines and patterns into the surface to create texture and designs. The carved areas pick up glazes differently and become highlighted after firing. Intricate patterns can be carved to make each clay ball unique.
Inlaying is a technique that involves pressing pieces of colored clay into the surface to form mosaic designs. The contrasting colors of the inlaid clay show through once the piece is completed and fired. Inlay can be used to create simple patterns or detailed images.
There are many other surface techniques as well, like staining with colored slips or pigments, burnishing areas to a sheen, adding appliques and textures with additional clay, and more. The options allow each clay ball to become a little work of art.
Use Cases
Clay balls have a variety of uses, depending on how they are produced.
One of the most common uses is for plant pots and planters. Air-dried clay balls work well for this purpose, as they allow moisture to soak through while still providing structure and shape. Small clay balls can be pressed into a mold to create a planter in any shape and size desired. Larger clay balls can be stacked or arranged into the shape of a pot. The clay balls give height for proper drainage while also wicking moisture to plant roots.
Clay balls are also popular for making toys and craft projects. Companies produce sets of small colored clay balls that can be used similarly to beads for bracelets, necklaces, and more. Air-dried and low-fired clay balls work well for sculpting and molding into shapes. They are lightweight enough for figurines and characters. These types of clay balls also allow kids to shape and create their own toys.
Higher-fired clay balls have structural integrity for things like plant water reservoirs, filtration media, and building materials. Their porosity and shape gives them useful properties for wicking, draining, filtering, and dividing space. Landscapers and engineers have come up with innovative ways to use clay balls for functional projects.
With the range of production methods for clay balls, there are endless possibilities for using them in crafts, decor, hobbies, industrial applications, and more.
Conclusion
Throughout this article, we’ve explored the ingredients and processes used to create clay balls. The main component is clay, which can come from natural sources or be produced synthetically. To improve the properties and workability of the clay, additives like grog, vermiculite, and bentonite may be incorporated.
Once the clay mixture is prepared, it can be hand formed or molded into spheres. These unfired clay balls must then dry slowly and evenly to avoid cracking. The next step is firing the balls in a kiln, which hardens them through sintering. Optional decorating and glazing can occur before or after firing.
The versatility of clay allows balls to be customized for many applications. They can be used in crafts, flower pots, ball mills, pellet stoves, and more. With the right clay and technique, beautiful and functional clay balls can be achieved.