When Should You Stamp Your Pottery?
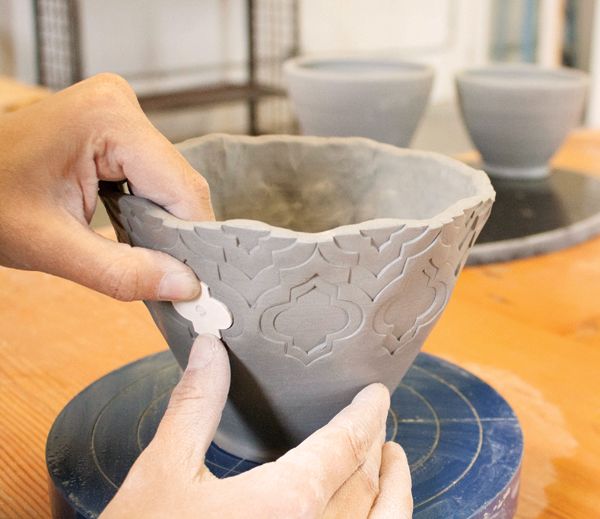
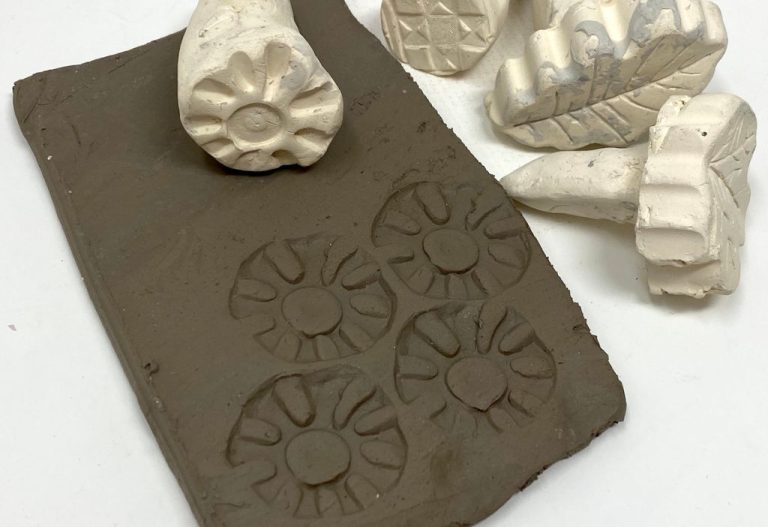
Pottery stamping is the process of imprinting designs, patterns, letters, or images onto clay or glazed ceramic using hand tools called stamps. Stamping allows potters to quickly decorate and personalize their pottery pieces with motifs. There are three main stages during pottery creation when stamps can be used: on greenware (unfired clay), on bisqueware (once-fired clay), and on finished glazed pieces.
Stamping unfired greenware can create impressions with greater detail and depth versus stamping clay that has been fired, as greenware is still soft and malleable. Bisque stamping pre-glazing provides a way to decorate bisque pieces with color that is then sealed in under a transparent glaze. Stamping glazed pieces produces visible glossy embossed designs. Understanding the options for when to stamp clay helps potters determine the look they want to achieve.
Greenware Stamping
Greenware refers to pottery that has been shaped but is still in its unfired, soft state. Greenware is leather-hard, meaning the clay has dried enough that the piece maintains its shape but is still soft enough to stamp impressions into the surface.
Stamping greenware has several advantages:
- The clay is still soft so the stamps can make deep, crisp impressions.
- Once fired, the stamped designs will be permanent.
- If any mistakes occur, the design can easily be altered while the clay is still soft.
To properly stamp greenware:
- Make sure the clay is leather-hard. If too wet, the stamp may slip or make an unclear impression. If too dry, the stamp may drag or crack the clay.
- Lightly dust the stamp with cornstarch if needed to prevent sticking.
- Press the stamp firmly and evenly into the clay in one motion. Rocking or twisting can distort the image.
- Let the stamped clay sit for 10-30 minutes before rehandling to allow impressions to set.
Stamping on greenware is ideal when you want crisp impressions with clean edges in the final pottery. It offers the most control over the stamped design.
Bisque Stamping

Bisqueware refers to pottery that has been fired once at a low temperature, typically between 1500°F – 2100°F. At this stage, the clay has hardened but is still porous and able to absorb decorations. Bisque stamping refers to stamping designs onto bisqueware before it goes through a final glazing and firing.
There are a few pros to bisque stamping:
- The bisque’s porous surface provides good traction for stamping, allowing for more detailed impressions.
- Mistakes can be erased from bisqueware since the clay is still porous.
- Glazes and underglazes work well over stamped bisque.
Some cons of bisque stamping include:
- The bisque’s porousness means stamped designs may appear faded after final firing. The glaze fills in the porous areas.
- Detailed stamps don’t always transfer well onto the coarse bisque surface.
- Bisque can chip more easily than leather-hard clay when stamping.
Overall, bisque stamping is a good choice if you want to use colored glazes or need to erase mistakes. The porous bisque gives stamped impressions character but can present challenges for very detailed designs.
Glaze Stamping
Glaze stamping involves impressing a design into uncured glaze before firing pottery. It allows for bright, decorative designs to be added on top of a glazed surface. Glaze stamping is done when the glaze is dry to the touch but not fully cured or hardened. The glaze needs to be leather-hard for the stamp to leave a clean, crisp impression.
When glaze stamping, it’s important to use the right consistency of glaze – too thick and it won’t release the stamp, too thin and it will run, blurring the design. Aim for a smooth, yogurt-like consistency. Only apply a thin layer of glaze where you plan to stamp. Let the glaze dry completely before stamping to avoid messy results.
Using properly prepared glazes and stamps will help ensure a clear impression. Clay stamps with crisp, carved designs work best. Press the stamp firmly into the leather-hard glaze using even pressure, and hold for a few seconds before slowly pulling the stamp away perpendicular to the surface. Clean excess glaze off stamps between impressions. Allow glaze to dry completely before firing.
When to Avoid Stamping
While stamping is a popular method to decorate pottery, there are a few instances when the technique should be avoided. The main concern is to prevent damage to fragile or thin pieces. Stamping requires applying pressure which can lead to cracking or even breaking if care is not taken.
According to pottery experts on Reddit, wet or leather-hard clay should never be stamped (source). At this stage, clay still contains moisture and is quite soft and malleable. The force of stamping will distort the shape and any embellishments will blur. It’s best to wait until the pottery has dried and firmed up during the greenware stage. At that point, the clay will have enough stability to withstand the stamping process without denting or cracking.
Thin or delicate pieces like plates, bowls, and cups also require extra caution when stamping. Applying too much pressure on thin walls can cause cracks or even poke holes straight through the pottery. Lightly stamping in small sections may be possible for experienced ceramic artists. However, beginners should avoid stamping very fragile greenware altogether. The safer option is to stamp these pieces when they have been fired into bisqueware for added strength.
With the proper technique and timing, potters can stamp most pieces without damage. But knowing when to avoid stamping based on the clay’s wetness and the pottery’s fragility is key to preventing cracked and broken projects.
Stamping Tools
There are various tools you can use for stamping pottery, each with their own unique benefits:
Custom Stamps
Custom stamps allow you to imprint any custom design onto your pottery. They are typically made from rubber or acrylic and can be carved yourself or ordered. Make sure to clean any custom stamps thoroughly between uses and store properly so the carving doesn’t get damaged or distorted.
Linocut Stamps
Linocut stamps are carved from linoleum material. They create a handmade, organic stamped design. Linocut stamps require proper carving tools and techniques but allow lots of customization. Clean the stamps gently to preserve the linoleum. Store flat and avoid moisture or heat.
Found Object Stamps
Any interesting object can be turned into a stamp, like sea shells, leaves, lace, or fruit. Press the object gently into the clay. Natural objects may only work once. Clean and dry man-made objects like buttons after stamping if you wish to reuse them.
Printing Blocks
Carved printing blocks made of wood, linoleum, rubber, or photopolymer can impress multi-color detailed designs into clay. Clean thoroughly after use. Photopolymer blocks can be reused many times if protected and stored properly.
Having the right stamping tools allows for creative designs on pottery, but proper use and care will help the stamps last. Always clean, dry, and store stamps and blocks properly.
Stamping Techniques
There are two main types of stamping techniques used in pottery – impressing and relief stamping. With impressing, the design is pressed into the clay, leaving an impression behind. This involves stamps with engraved patterns. With relief stamping, the design is raised up and leaves an embossed effect on the surface 1. This uses stamps with raised patterns.
Proper technique is important for getting clean, crisp stamped designs. You’ll want to apply firm, even pressure straight down as you stamp. Rocking or wiggling can distort the designs. Work carefully and methodically to ensure proper alignment between stamps. Having guides like a grid can help with consistency. Proper clay consistency is also key – too soft and designs may blur, too firm and stamps won’t impress fully. Find the right amount of moisture for imprinting without distortion 2.
Common Stamping Mistakes
There are a few common mistakes that potters often make when stamping their pieces that can lead to unsatisfactory results. One of the most common is stamping the clay at the wrong stage. Stamping too early, when the clay is still wet, can result in blurred or distorted impressions as the clay continues to slump.1 Waiting too long and stamping when the clay is starting to stiffen can also lead to poor imprints. The clay needs to be at the ideal stage between these two extremes – called the “leather hard” stage – for the crispest stamps.
Applying uneven pressure when stamping is another frequent error. This can create stamp impressions that vary in depth and clarity across the piece of pottery. Using excessive pressure can also result in distortion or gaps in the design.2 It takes practice to develop a feel for the right amount of force to apply. Using a stamping tool with a handle can help provide more control and even pressure.
Creative Stamping Ideas
Stamping opens up a world of creative possibilities when decorating pottery. Here are some ideas for getting creative with stamping:
Use words or phrases as a unique stamp design. Print out the text you want in a large font, cut out the letters, and use as individual stamps to imprint words onto your piece. This allows you to customize pieces with names, dates, inspirational words, or fun phrases.
Explore stamping different textures. Fabric, lace, leaves, corrugated cardboard, mesh, and other textured materials can make interesting patterned stamps. Press these textures into clay to leave behind an imprint of the pattern.
Stamp simple shapes in repeating patterns or alternating designs. Geometric shapes like circles, squares, triangles, stars, or hexagons can be stamped in an orderly or random pattern for visual interest.
Layer multiple stamps to create more complex designs. Stamp one design first, then stamp a second design partially overlapping the first. This blending of stamped designs adds depth and intricacy to the final piece.
Consider creative ways to use the stamped design. Turn a stamped shape into the eye of an animal or the center of a flower, for example. Let the stamping complement and enhance your overall design.
Use stamps on curved surfaces. Roll out a slab of clay and use stamps to decorate the curved clay surface before assembling a pot or bowl.
Combine stamping with other techniques like carving, incising, or painting for added embellishment.
Let your creativity guide you as you experiment with stamp designs, materials, and techniques to make your stamped pottery truly unique.
Conclusion
Proper timing and technique are crucial when stamping pottery. The best results come from stamping at the right stage, whether it be on raw greenware, bisqued pieces, or finished glazed ware. Using the proper tools and mastering stamping methods help avoid common mistakes like smudging or light impressions.
When stamping greenware, go deep and be bold for crisp results. Bisque can be stamped multiple times if needed. Glazing first providesoptions to layer colored glazes under or over stamped areas. Avoid stamping extremely wet, thick, or dry clay which causes poor impressions.
Investing in quality stamping tools with ergonomic handles prevents hand fatigue. Practice rolling pressure evenly when stamping and imprinting at a slight angle. Maintaining proper stamp care between uses saves time re-carving warped stamps. Understanding how to correctly stamp pottery helps create beautiful finished pieces.


