Clay Pottery Carving Techniques: From Simple To Intricate
Clay pottery carving is the process of creating shapes, patterns, and textures on hardened clay surfaces through the subtraction method. The techniques date back thousands of years, with evidence of carved clay vessels and objects found in ancient Mesopotamian sites like Uruk, where potters first began using clay as a raw material for pottery (Source). Through history, pottery carving has been an important technique for adding decorative elements and artistry to functional and ornamental ceramic wares.
Pottery carving utilizes a range of tools, from simple household items like spoon handles and knitting needles to specialized loops, ribs, and dental tools. The techniques can range from very simple incised line patterns to intricate sculptural shaping and hollowing out of vessel forms. Relief carving involves cutting into the clay surface to create raised areas and sunk areas. Intaglio carving is the opposite, where shapes are carved out to form indented areas. Sculptural carving creates fully three-dimensional effects. The carved clay surface is then smoothed, fired, and glazed to complete the ceramic object.
This overview will cover the full range of pottery carving techniques, from fundamental relief carving and incising to complex sculptural hollow forms. We’ll look at essential tools and preparations, classic and innovative carving techniques, finishing processes, and inspiring examples of intricately carved clay art and pottery.
Tools for Clay Pottery Carving
There are a variety of tools that can be used for clay pottery carving, ranging from basic hand tools to more advanced power carvers. The key tools for clay carving include:
Basic Carving Tools
Basic hand tools like loop tools, ribbon tools, and needle tools allow you to carve fine details and textures into clay surfaces. Loop tools have a variety of shaped wire or wooden tips that can carve grooves and indentations. Ribbon tools have thin, flexible metal blades that can slice delicate lines and textures. Needle tools are sharp, pointed metal tools for incising fine lines and details. Smooth wood and metal rib tools are also useful for smoothing surfaces.
Pottery wheel cutters like fettling knives allow you to trim and refine wet clay on the wheel. Sponges can create textured effects. Basic craft knives are handy for cutting and scraping clay.
Advanced Carving Tools
More specialized clay carving tools include clay extruders, which push clay through dies to create ropes, slabs, and custom shapes. Clay shapers have silicone tips that can mold, shape, and smooth clay without sticking. Decorating tools like rubber stamps and rollers can quickly imprint patterns and textures.
Electric pottery wheels allow throwing symmetrical forms to then carve and sculpt. Armatures and foam supports can be carved over. Power rotary tools like the Dremel offer rotational burrs, grinding stones, sanding drums, and cutting bits for high speed carving, drilling, sculpting, grinding, and polishing on clay forms.
Power Carvers
Power carvers such as Foredom or Mastercarver are specialized electric rotary tools designed specifically for clay and can rapidly carve, cut, and sculpt wet clay with interchangeable burrs and blades. These high powered tools allow carving intricate details and textures quickly.
Preparing the Clay
The first step in pottery carving is preparing the right clay. For carving, a high-quality clay like stoneware is recommended since it has high plasticity, strength, and low shrinkage and warping during drying and firing (How to Prepare Clay for Pottery). Select a clay body with 25-35% grog or sand content, as the grittiness will add strength to more thinly-carved areas.
Before carving, the clay must go through a wedging or kneading process. This removes air bubbles and results in a uniform moisture level throughout the clay. To wedge, roll a lump of clay away from you on a clean surface using the palm of your hand. Apply weight as you roll it back toward yourself (How to Prepare Clay for Pottery). Cut and recombine the clay, repeating the wedging process until no air pockets remain.
Make sure the clay is an even thickness wherever you intend to carve. Use a rolling pin or slab roller for flat areas. Allow adequate drying time between steps; leather-hard consistency is ideal for carving. Store unused clay in an airtight bag or container to prevent excess drying.
Simple Carving Techniques
Some simple techniques to get started with carving clay include sgraffito, mishima, and slip trailing. These approaches allow beginners to add decorative designs to their pottery without advanced skills.
Sgraffito involves using a tool like a wooden skewer to scratch line designs into leather-hard clay. The scratched lines reveal the clay color underneath any slips or glazes. Sgraffito works well for making geometric patterns or borders around a ceramic piece.
Mishima is a Japanese technique where you incise line designs into the clay and then fill them with colored slip or glaze. This helps create raised relief lines for a dramatic effect. Mishima takes more patience but allows for intricate patterning.
Slip trailing involves drizzling liquid clay in delicate lines over the main clay body. Slip with contrasting colors works best for this method. You can create bold or delicate designs depending on the tool used and the viscosity of the slip. Simple leaves, circles, and squiggly lines work well for beginners.
For detailed tutorials and examples of these simpler clay carving approaches for beginners, refer to sources like this overview from Ceramic Arts Network.
Relief Carving
Relief carving involves carving shapes and forms that project outward from the surface of the clay. There are several common relief carving techniques that offer different levels of depth and dimension:
Low Relief
Low relief carving involves shallow carving where elements slightly protrude off the surface, usually less than half their width. This subtle depth creates a subtle shadow effect. Low relief is great for beginners as it allows focus on the overall design without intricate carving.https://ceramicartsnetwork.org/daily/article/Relief-Carving-Techniques-for-Expressive-Functional-Pottery
High Relief
High relief involves carving elements that project out from the surface over half their width, creating deeper undercuts and shadows. This adds more dimension and sculptural quality. High relief requires removing more clay to differentiate the layers.
Bas Relief
Bas relief is where elements project less than half their actual depth from the background. This style keeps the overall surface relatively flat while adding modeled forms. Bas relief offers a middle ground between low and high relief effects.
Intaglio Carving
Intaglio carving involves creating incised lines, textures, and patterns into the clay surface. The carving is indented below the surface, with the design standing out in relief. Intaglio designs can be created through a variety of techniques:
Incised lines are carved into the clay using a variety of tools with sharp points or edges. The lines follow the contours of the form and can be straight, curved, zig-zagged, geometric, organic, or combinations. Intaglio lines create visual texture and add interest to the surface design.
Cross-hatching is an intaglio technique using intersecting sets of parallel lines carved into the clay. The lines intersect at various angles, creating interesting geometric patterns. Cross-hatching adds tone and shading effects.
Stippling is a technique using small dots carved with a pointed tool into the surface. The dots can be in tight, uniform patterns or more organic, radiating styles. Stippling creates rich visual textures and intricate tonal effects on the clay surface.
Intaglio carving allows for great freedom and originality of design. The indented carving catches shadows and stands out in relief, adding visual depth and hand-crafted appeal. With practice, intricate patterns can be achieved through these fundamental intaglio techniques.
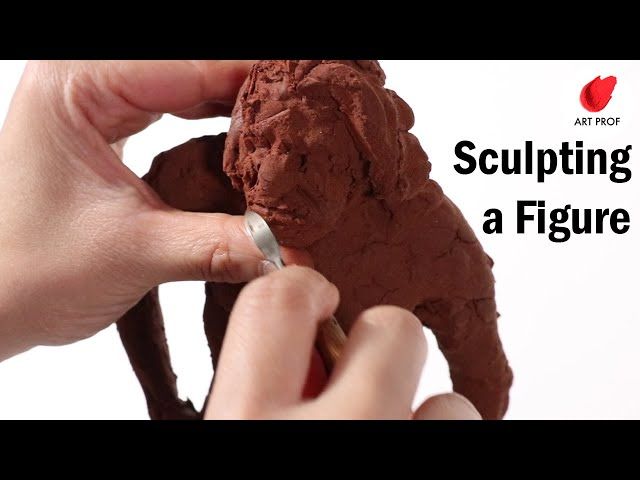
Sculptural Carving
Sculptural carving involves shaping the clay into free-form three-dimensional objects and figures. This requires working the clay into contours and dimensions to achieve the desired sculptural form. The techniques used in sculptural carving are:
Shaping – Using your fingers, loops tools, ribbon tools, and various shaped sculpting tools to manipulate the clay into shapes and contours. Pinching, pulling, smoothing, and pressing the clay to form curves, points, edges, hollows, and other sculptural elements.
Contouring – Carefully contouring the surfaces and forms to create detailed, refined, and anatomically-correct figures if desired. Building up mass in some areas while delicately thinning out others using various sculpting and carving techniques.
Sculpting detailed figures – For sculpting highly detailed figures, small loop tools, dental tools, and needle tools allow you to refine details like facial features, expression, clothing folds, hair, hands, feet and intricate textures. Work slowly and carefully to sculpt anatomy and additional fine details.
Complex Carving Techniques
Once you have mastered the basics, you can move on to more advanced carving techniques that allow for intricate details and complex designs. Some methods to try are:
Layering colors and textures – You can achieve visual depth by carving layers of colored clay on top of each other. Try alternating smooth and textured layers. Carve through the layers to reveal the colors and textures underneath.
Piercework – This involves carving completely through the clay to create voids and latticework designs. Use sharp tools and brace the clay on a sandbag or other soft surface when piercing all the way through.
Filigree – For very delicate, lacy carved details, use specialized loop and spear tools to carve fine lines and holes. Build up intricate patterns of negative space to make filigree designs.
In addition to carving into clay you can also add details by applying slip-trailing, textures with stamps, or attaching bits of colored clay. The options for complex ceramic carving are virtually endless with practice.
Finishing and Polishing
After the carved clay pottery piece has been allowed to dry completely, the final step is finishing and polishing to refine the surface and smooth out any tool marks. Proper finishing and polishing will enhance the carved details and give the piece a professional, high-quality appearance.
Sanding is an important part of the finishing process. Medium grit sandpaper can be used to softly round any sharp edges and blend tool marks. Progressively finer grit sandpaper, up to 600 grit, can be used to polish the surface. It’s important not to sand too aggressively or you may remove intricate carved details. Gentle, circular motions with the sandpaper will smooth the surface without damaging the design.
Burnishing is another finishing technique that compresses the clay surface to a smooth, glossy finish. Special polished stones or wood tools are rubbed across the surface. It takes some practice to master burnishing, but the results can be stunning on carved clay.
Finally, most carved clay pieces will need some kind of sealer or finish to protect the surface after polishing. Clear acrylic sprays work well for this purpose. Multiple thin coats are better than one heavy coat when applying sealant. Allow each coat to fully dry before adding the next. The sealer will protect the carved clay and keep it looking its best for years to come.
With the proper sanding, burnishing, and sealing, the finishing process can really make intricate carved details stand out with a beautiful sheen. Taking the time to properly finish carved clay pottery will take the piece to a whole new level.
Inspiring Examples of Intricate Carved Ceramics
Some of the most stunning examples of intricate ceramic carving come from artists who have truly mastered the craft. Here are just a few of the incredible carved ceramic works that showcase the possibilities of this artform:
Jennifer McCurdy is an American ceramic artist known for her beautifully carved vessels, bowls, and wall pieces. Her works feature finely carved decorative elements like flowers, vines, and geometric patterns. The level of detail and precision in her carvings is remarkable, down to the tiny veins on a sculpted leaf or the minute facets on a carved gemstone. She utilizes a range of carving techniques from intaglio to relief to sculptural to create works of great depth and complexity.
Chinese ceramicist Gu Jianlong produces intricately carved porcelain vases and pots adorned with auspicious symbols, landscapes, and dragon designs. His technical mastery allows him to carve delicate feathery plumage on a porcelain phoenix figurine or miniature interlocking scales on an etched dragon vessel. The sheer intricacy of the designs and motifs carved into the porcelain is astounding.
Korea’s KwangJu Yo is revered for his nature-inspired carved celadon vessels. Through his minimalist carvings of bamboo, orchids, and chrysanthemums, he makes the clay come to life. His designs capture the graceful curves and details of flora with a meditative quality. Every leaf vein and flower petal has been meticulously carved using both intaglio and relief techniques for a multi-dimensional effect.
These artists exemplify just how intricate and detailed clay carving can be when practiced with great skill, creativity, and patience. Their carved ceramic artworks exhibit the transformative possibilities of this ancient craft, where humble clay is elevated into stunning works through the mastery of carving techniques.